by Wildwood Outdoor Living | Dec 12, 2023 | Gardening 101
Indoor Paperwhites 101
If you’re looking for a way to brighten up your indoor space and enjoy the beauty of nature even when it’s snowing outside, then indoor paperwhites are the answer. In this week’s blog, we’ll explore everything you need to know about indoor paperwhites – from how to plant them properly to tips on caring for them throughout their blooming period. So get ready to discover the joy of having fragrant flowers grace your home this winter season with these beautiful indoor winter flowers – the lovely and enchanting indoor paperwhites.
About Indoor Paperwhites
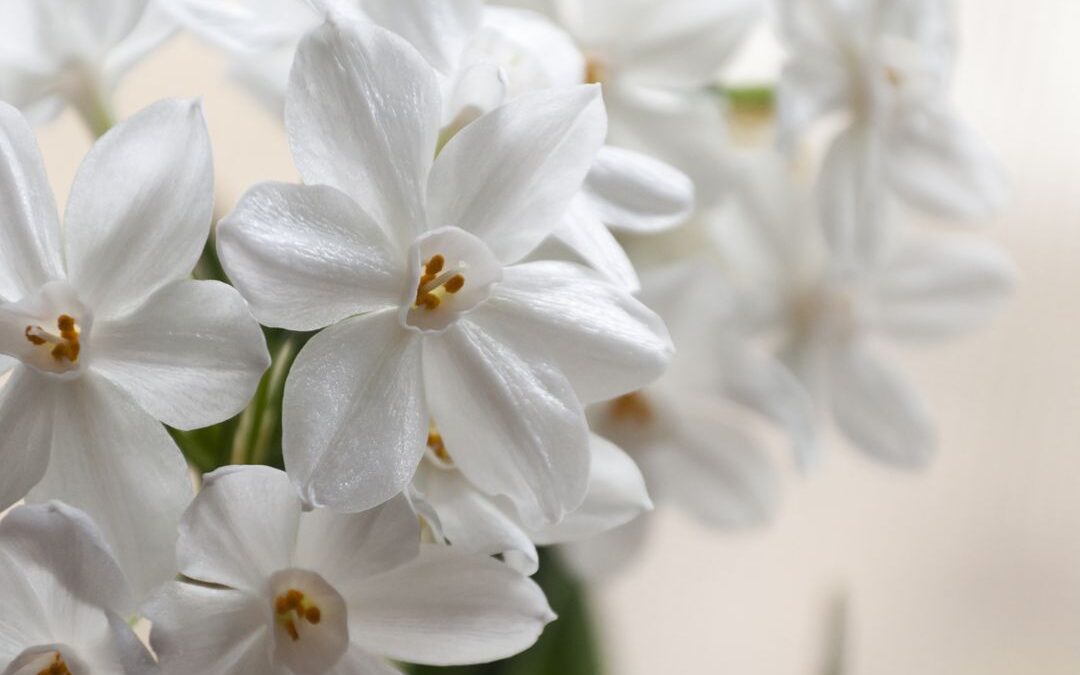
Indoor paperwhites are beautiful flowering plants that bring a touch of elegance and freshness to our homes, especially during the winter months. These delicate flowers are scientifically known as Narcissus papyraceus and typically originate from regions such as Spain and Portugal, where they thrive in mild climates. Now they have been cultivated for centuries and have become a beloved addition to indoor gardens worldwide.
One of the fascinating aspects of paperwhites is their ability to bloom during the winter season. Unlike other flowering plants that require warm weather and ample sunlight, paperwhites have the unique characteristic of blooming indoors when temperatures drop. This makes them a popular choice for adding colour and vibrancy to our homes during the colder months.
How to Grow Indoor Paperwhites

Growing paperwhites can be a delightful and rewarding experience, as these elegant flowers bring beauty and fragrance into any indoor space. To ensure successful growth, it’s essential to pay attention to the soil, bulb depth, and container size.
Planting Indoor Paperwhites
1.) When it comes to soil, paperwhites prefer well-draining options such as potting soil or a mix of peat moss and perlite. Avoid using heavy garden soils that can retain excess moisture, as this may lead to root rot.
2.) Bulb depth is another crucial factor in growing paperwhites. Ideally, place the bulbs in the container with their tips just above the surface of the soil. This allows them enough room for root development while ensuring stability.
3.) Choosing the right container size is also important for proper growth. Select a container that provides enough space for multiple bulbs without crowding them. This allows each bulb to grow and bloom freely without competing for resources.
Watering Indoor Paperwhites
When it comes to watering your potted paperwhites, it’s important to strike a balance. Overwatering can lead to rotting bulbs, while underwatering can hinder their growth. Aim to keep the soil evenly moist but not waterlogged. A good practice is to water them when the top inch of soil feels dry to the touch.
Sun Requirements for Indoor Paperwhites
Sunlight requirements play a crucial role in the development of paperwhites. These plants prefer bright, indirect light, so placing them near a sunny window or providing them with filtered sunlight will help them flourish. Avoid exposing them directly to harsh sunlight as it may cause leaf burn and cold-drafty windows.
Temperatures for Indoor Paperwhites
Maintaining suitable temperature conditions is also vital for the well-being of your indoor paperwhites. They thrive in cooler temperatures ranging from 50°F to 70°F (10°C to 21°C). Keep them away from drafts or heat sources such as radiators or vents that could disrupt their growth.
Common Issues with Indoor Paperwhites and How to Solve Them
Indoor gardening can be a rewarding and fulfilling experience, but it’s not without its challenges. If you’ve noticed yellowing leaves in your paperwhite plants or stems flopping over, don’t worry – you’re not alone. These common issues can be easily troubleshooted and resolved with a few simple tips.
1.) Yellowing leaves in paperwhite plants are often a sign of overwatering. These delicate plants prefer moist soil, but too much water can lead to root rot and nutrient deficiencies. To solve this problem, make sure you’re allowing the soil to dry out slightly between waterings. Additionally, ensure that your pot has proper drainage to prevent water from sitting at the bottom.
2.) Another common issue faced by indoor gardeners is stem flopping in paperwhite plants. As these plants grow tall and produce beautiful blooms, their stems can become top-heavy and bend under their weight. To prevent this, provide support for the stems by gently tying them to stakes or using plant supports like bamboo sticks. This will help keep the stems upright and maintain their aesthetic appeal.
3.) Lastly, avoiding overwatering problems is crucial for the health of your paperwhite plants. These bulbs thrive in well-draining soil that allows excess moisture to escape easily. Be mindful of how often you water your plants and ensure that the soil is never excessively wet or soggy. It’s better to underwater than to overwater when it comes to paperwhites.
By following these troubleshooting tips and implementing preventive measures, you’ll be able to enjoy vibrant and healthy indoor paperwhite plants all year round. Remember, patience and observation are key when it comes to nurturing any plant – so don’t get discouraged if it takes a little trial and error before finding the perfect balance for your green companions!
TIP: Looking for earlier blooms? Try re-chilling the bulbs before planting them. By placing the bulbs in a cool location, such as a refrigerator, for several weeks prior to planting, you can mimic the cold winter conditions that paperwhites require for blooming. This chilling period helps trigger their growth cycle and prompts earlier flowering.
Decorate with Indoor Paperwhites

Indoor flower arrangements can instantly brighten up any space, and when it comes to winter blooms, paperwhites are a popular choice. These delicate flowers not only add a touch of elegance but also fill the air with a sweet fragrance that can uplift your mood. If you’re looking for inspiration on how to decorate with indoor paperwhites in your home or office space, we have some creative and DIY ideas for you. From simple yet stunning floral arrangements to unique ways of incorporating these winter blooms into your existing decor, there are plenty of options to explore.
Indoor Paperwhite Centerpieces
Consider creating a centerpiece using a clear glass vase filled with water and floating paperwhite bulbs. This minimalist approach allows the beauty of the flowers to take center stage while adding a touch of tranquility to any room. Alternatively, you can showcase paperwhites in vintage teacups or mason jars for a charming and rustic look.
Paperwhite Accessories
For those who prefer more elaborate arrangements, try combining paperwhites with other seasonal flowers like holly berries or pine branches. This creates an enchanting winter wonderland effect that is perfect for holiday gatherings or special occasions.
Paperwhites on Wreaths
Another unique idea is to incorporate paperwhites into wreaths or garlands. By intertwining these delicate blooms with greenery, you can create stunning wall decorations that bring the beauty of nature indoors.
Enjoy the Fragrant Beauty of Indoor Paperwhites All Winter Long!

In conclusion, embracing the fragrant beauty of indoor paperwhites during the winter months can bring joy and a touch of nature into our homes. These delicate flowers not only add a pop of colour to any space but also fill the air with their delightful scent.
By following the simple steps outlined in this guide, you can successfully grow and enjoy paperwhites indoors throughout the winter season. Whether you choose to display them in your living room, office, or bedroom, these charming blooms are sure to brighten up even the dreariest of winter days.
So why not treat yourself to the enchanting allure of indoor paperwhites? Create your own little oasis of beauty and fragrance this winter and revel in the soothing presence they provide. Let their delicate petals and captivating aroma transport you to a place of tranquility and serenity.
Indoor paperwhites truly are a testament to nature’s resilience and ability to bring us joy even during colder months. So go ahead, embrace their fragrant beauty and let these lovely flowers remind you that spring is just around the corner.
Have a suggestion or question?
Sign up here for more blogs dedicated to better gardening!
by Wildwood Outdoor Living | Aug 8, 2023 | Gardening 101
Welcome to Turnips 101, your ultimate guide to all things turnips! Whether you’re a seasoned vegetable enthusiast or just starting your culinary journey, this weeks blog will provide you with everything you need to know to grow your very own Turnip this season! Let’s get started…
About Turnips
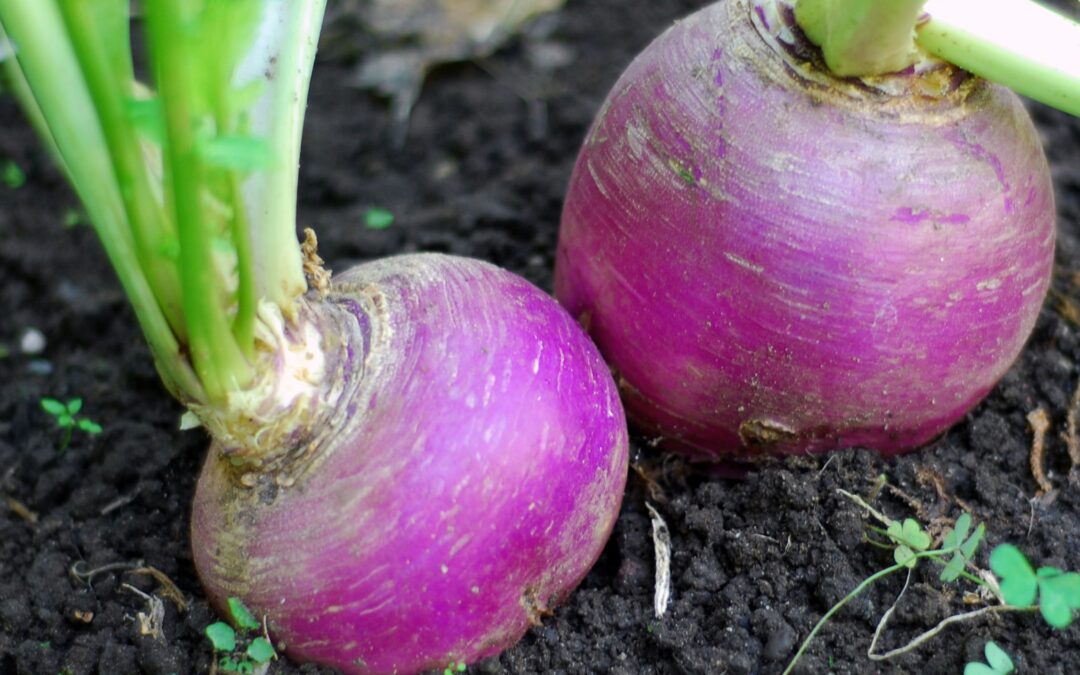
Turnips, often linked to potatoes and beets, are actually more closely related to radishes and arugula. They all belong to the mustard family within the Brassica genus. The turnip plant offers both edible parts – the bulbous taproot, which can be white or purple, and the leafy greens. While originating in eastern Asia, turnips gained popularity and were extensively cultivated during the Roman Empire. Today, they are grown and consumed in temperate regions across the globe.
Turnip Flavour Profile
The mild spiciness of turnips contributes to a unique flavor profile that falls somewhere between that of a potato and a radish. This subtle heat adds an interesting dimension to the overall taste experience. Similar to horseradish, the flavors of concentrates tend to be more pronounced in the sinuses rather than on the tongue. This makes them ideal for combining with various root vegetables or complementing other bold flavors like ginger. Their concentrated nature adds a unique and dynamic taste to culinary creations.
Mature turnips offer a bolder taste compared to their younger counterparts. They are particularly suitable for mashing or including in hearty soups and stews. Turnips, like many root vegetables, are resilient and cost-effective options for keeping fresh produce available during the winter season.
TIP: It’s worth noting that larger and older turnips may have tougher skins, which can result in a slightly bitter taste. In such cases, peeling them before consumption is recommended to enhance their flavor.
How To Grow Turnips
Turnips are a versatile vegetable that can be enjoyed throughout the year. However, their prime season is in the fall when they are fully mature and freshly harvested. In the spring, turnips are still small and have a delightful sweetness.
Difficulty: While it is relatively simple to cultivate this plant outdoors in a garden setting, it may not be the most suitable choice for container gardening.
Timing: To achieve successful growth, it is advisable to directly sow seeds from the month of April through August. This timeframe provides optimal conditions for germination and establishment of plants. By following this guideline, gardeners can maximize their chances of achieving a fruitful and vibrant garden.
Sowing: To ensure optimal growth, it is recommended to sow your seeds thinly at a depth of 1cm (½”) in rows that are spaced apart by 30-45cm (12-18″). As the plants start to grow, thin them out, leaving a distance of 5cm (2″) between each plant. This allows for sufficient space for the plants to develop and receive adequate nutrients.
Soil: These plants have a moderate to heavy appetite for nutrients and thrive best in rich, loamy soil that has been enriched with composted manure. To ensure optimal fertility, it is recommended to add 4 liters (1 US gallon) of complete organic fertilizer for every 10 square meters (100 square feet) of bed. Additionally, it is advised to apply lime to the beds in the fall before planting, as this helps bring the pH level to an ideal range of 6.0 – 6.8.
Growing: To achieve optimal growth of these plants, it is recommended to have loose soil and ensure regular watering. It’s important not to leave them in the ground for longer than necessary, as root maggots can cause significant damage. Choose a sunny area in your garden to plant turnip seeds and sow short rows frequently, similar to how you would with radishes.
Pests & Disease: The cabbage root maggot, scientifically known as Delia radicum, is a small fly that poses a threat to brassica crops. These flies lay their eggs on the soil near the base of brassica plants. To safeguard directly-seeded crops from infestation, utilizing a floating row cover can offer effective protection.
Harvesting Turnips
Turnips are a vegetable that can be harvested relatively quickly after planting. Generally, they are ready to be harvested within 40 to 55 days. To ensure that turnips are ready to be harvested, it is recommended to wait until they reach a diameter of 3 inches. However, if you prefer a milder and sweeter taste, it is advised to pick them when they are smaller in size.
Have a suggestion or question?
Let us know at info@wildwoodoutdoorliving.com.
Sign up here for more blogs dedicated to better gardening!
by Wildwood Outdoor Living | Mar 8, 2023 | Gardening 101
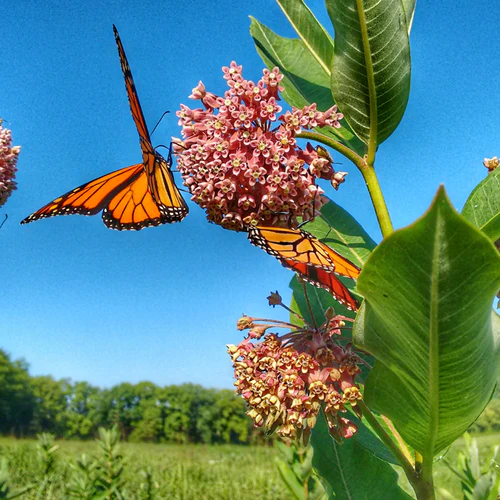
Milkweed is one of the most essential plants in our environment. It provides food and shelter to wildlife, including butterflies, bees, moths, and other pollinators. In addition to providing these benefits, milkweed is easy to grow and can be found in many different climates. In this article, we will explore everything there is to know about milkweed.
About Milkweed
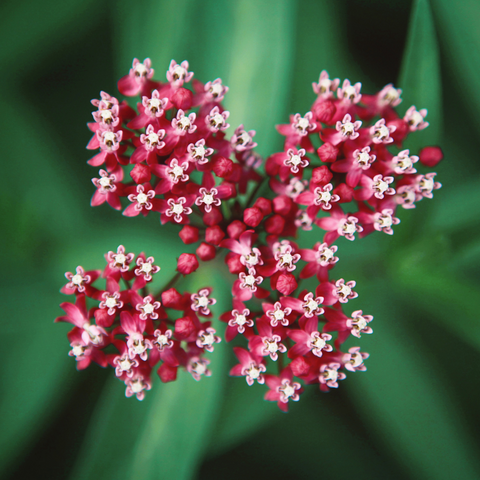
Milkweed belongs to the herbaceous family and is a perennial plant. When properly cared for, it can live up to two years. It’s a popular choice among butterflies as it provides them with a safe place to lay eggs, while their leaves serve as food for newly hatched larvae, allowing them to reproduce.
Canada has around thirteen distinct types of milkweed, one of the most popular being Aslepias. This plant blooms in pastels shades like pink, purple, white and orange, producing clusters of star-shaped flowers with milky sap inside their stems.
Historically
Humans have utilized milkweed for a long time, not only as an essential part of the ecosystem but also as a source of the material. Its silk-like fibres have been used to stuff pillows and mattresses for centuries.
For centuries, numerous indigenous tribes have also implemented milkweed for various medicinal purposes. It was applied as a treatment for warts, chewed to cure dysentery, and utilized in salves and infusions to ease swelling, rashes, coughs, fevers and asthma.
Pro-Tip: To escape the wind and find some reprieve after a tiring day, butterflies look for cozy spots like beneath leaves, between blades of grass, tucked between rocks or even huddled up on tree branches. As gardeners, the best thing we can do to provide a safe shelter for butterflies is to introduce a manmade butterfly home! Place your butterfly home near your popular butterfly flowers to make sure it’s visible, and add some sticks and dry leaves to help entice them.
How to Grow Milkweed

By introducing certain milkweed into your garden or landscape, you can create a natural habitat that will attract beneficial insects such as bees, butterflies, and other pollinators while also repelling common pests. This cheap and simple solution is a great way to make a positive impact on the environment while also taking care of pesky pest problems!
| Sun |
Full sunlight |
| Sow |
Start sowing the seeds indoors 6-8 weeks before the last frost date, and then transplant them or sow directly in late spring. The optimal soil temperature for germination is between 10-25°C (50-75°F). |
| Sprout |
7-35 days. |
| Cover |
Make sure to just sprinkle the tiny seeds with a sterilized seed starting mix. When it’s time for transplanting, be sure to keep them 30-60 cm or 12-24 inches apart. |
| Zone |
Hardy to Zone 3 |
| Difficulty |
Easy |
Pro-tip: All varieties of milkweed native to Canada contain a milky sap with poisonous qualities. Be sure to wear gloves when handling!
Popular Varieties to Try!
Have a suggestion or question?
Let us know at info@wildwoodoutdoorliving.com.
Sign up here for more blogs dedicated to better gardening!

by Wildwood Outdoor Living | Dec 6, 2022 | Gardening 101
With winter in full bloom, you can be sure to find holiday reminders around every corner. Of course, one of our favourite reminders that the holidays have arrived is the endless variations of Poinsettia blooms! From your home to the dentist’s office and everywhere in between. Poinsettias have made their way into the holiday hall of fame, and we’re here to share everything there is to know about them in this week’s blog, Poinsettias 101. Watch as President Gord Nickel shares a beautiful variety of Poinsettias for the holiday season.
About Poinsettias

Known for their excellent winter performance, Poinsettias are not native to snowy winters like we may think they are. Poinsettias are tropical plants that can be found in Mexico, growing up to 10 feet tall! When grown as an indoor plant, our Dark Canadian winters force Poinsettias into bloom, making them perfect indoor plants for us during the holiday season.
Belonging to the Eurphobia family, Poinsettias are relatives to a few familiar plants such as Crown of Thorns, African Milk Trees, Donkey Tail Spurge, Milkweed, Pencil Cactus, Casper Spurge and Matted Sandmat.
Varieties

Though they may seem like giant flower blooms, the leaves that resemble flower petals on Poinsettias are ‘Bracts’. These bracts can change colour according to the plant’s light exposure. With over one hundred different varieties, Poinsettias can be found in various shades of pink, yellow, white, green, multi-colour or even blue or purple! Though, not all colours are natural and can sometimes be painted on.
Did you know?

Pointsettia sap can cause dermatitis on skin contact. When handling Pointsettias, it’s best always to wear gloves to prevent irritations. You might have heard that Poinsettias are highly-toxic for pets and children. Not to worry, Poinsettias are not lethal. If your pet or child has ingested parts of a Poinsettia, they may experience a mild stomachache or skin irritations.
Poinsettia Care
Ready to take home a Poinsettia of your own? Check out the latest episode of Get Up and Grow with President Gord Nickel to learn everything you need to keep your Poinsettia happy this season. Plus, check out all the cool varieties we offer in store!
Have a suggestion or question?
Let us know at info@wildwoodoutdoorliving.com.
Sign up here for more blogs dedicated to better gardening!

by Wildwood Outdoor Living | Oct 30, 2022 | Gardening 101
Deer Repellent has come a long way to ensure that the safety of ourselves, the deer and our plants are the top priority. If you’re in the market for an effective deer repellent, we’ll share everything there is to know about our favourite product, Bobbex! Plus, follow along as our President Gord Nickel shows us a few special Remembrance Day bulbs and how he keeps them deer-free!
What is Bobbex?
Bobbex is an eco-friendly solution designed to deter deer, rabbits, squirrels, chipmunks, and groundhogs; you name it! Unlike most pest deterrents that are filled with unsafe chemicals that can harm pets, humans and plants, Bobbex is eco-friendly and safe for everyone when used as directed.
Long-lasting and easy to apply, Bobbex is a natural solution that provides your plants with nutrients. Meaning you can never over-spray your plants! Once used, it’s there to stay. Lasting through rain or snow for weeks and even longer during dormant seasons.
How Does It Work?
Well, it doesn’t smell like roses, that’s for sure! Bobbex is formulated with a wide variety of natural ingredients, including fish meal, fish oil, garlic, clove oils, putrescent eggs and more. As you can imagine, it’s not a pretty smell, and that’s precisely why it frightens and naturally repulses pests like deer.
With additional Nitrogen and Phosphorus properties, Bobbex is highly beneficial for plant growth. One of the best reasons to use Bobbex verse other chemical-based repellents is that it offers twelve nutrients that, once sprayed in a clear coat, can provide plants with additional moisture retention. Keeping them happy and healthy even during droughts!
How To Use Bobbex
Used as a topical spray, it is essential to note that Bobbex shouldn’t be used on ripened plants (you can only imagine what the solution must taste like!). It should not be digested.
Bobbex is often applied approximately every two weeks during peak growing season or when two inches of growth have developed. Once dormant season approaches, less frequent applications are necessary as the plant grows much less.
To apply Bobbex, be sure to follow the instructions on the label. For best results it is recommended to use a pressure washer. Once applied, Bobbex will take approximately six hours to dry, where the smell will also become almost undetectable to the human scent but remain strong to critters.
Spring Application
Begin by spraying in the Spring when the plants are approximately ½ inch out of the ground.
Summer Application
Bobbex should be sprayed in the early morning rather than in the day’s extreme heat. Plants may encounter phytotoxicity if spread when temperatures are above 85 degrees F. This is not due to the ingredients in the product, but rather the magnification of the sun through the water spread on plant’s surfaces. During Peak Growth season, application of Bobbex Repellents should be done about every 7 to 14 days, or when one to two inches of new growth has developed.
Fall Application
Bobbex should be used in fall months even though plants are no longer at their peak. If applications of Bobbex are interrupted, deer may lose their conditioning to avoid previously treated plants. Regular spraying of Bobbex trains deer to seek nourishment elsewhere. Bobbex is necessary in the fall (and winter) months for damage prevention to shrubs that keep their leaves throughout the year. These shrubs include rhododendrons, arborvitae, holly, and yews— all common plants that deer prefer the most!
Winter Application
Winter application should not be done below 35 degrees F. Water freezing on leaves can draw out moisture, harming the plant and causing browning along leaf edges. (This cautionary recommendation should be followed for all water based horticultural products.) During winter (dormant) season, Bobbex Repellents will endure much longer, (up to two months) so less frequent application is required.
Note: Bobbex will not stick well to wet surfaces, so be sure to apply to only dry plants.
Ask Gord Nickel
Have a suggestion or question?
Let us know at info@wildwoodoutdoorliving.com.
Sign up here for more blogs dedicated to better gardening!
by Wildwood Outdoor Living | Sep 14, 2022 | Gardening 101
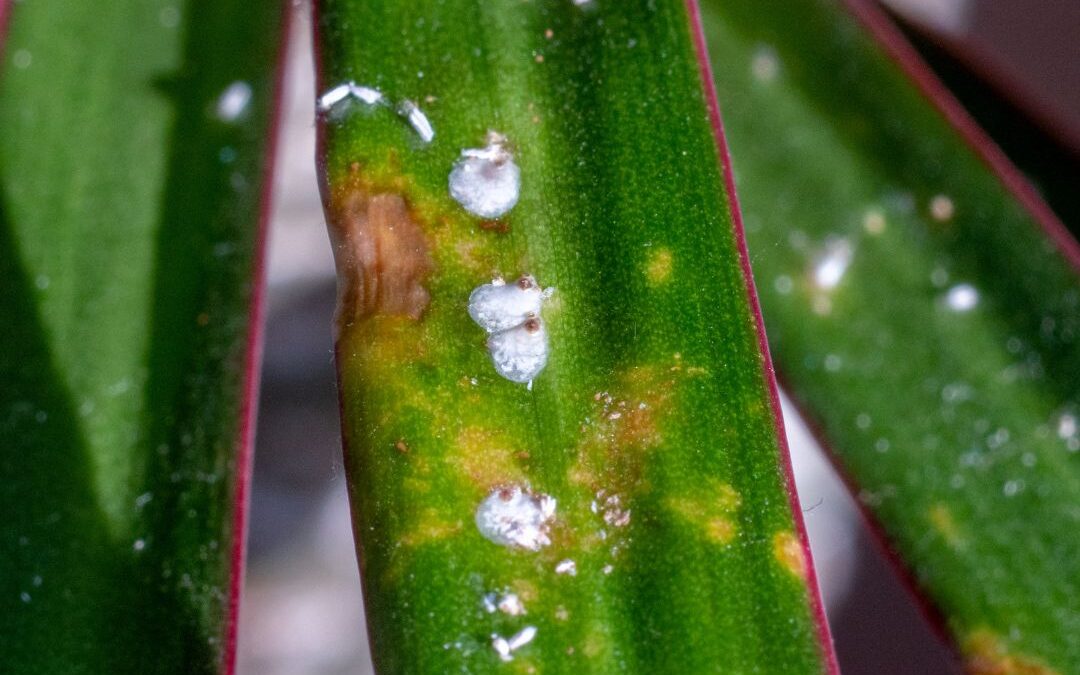
The summer is coming to an end, so it’s time to bring your plants inside. We said plants, not mealybugs! Before it’s too late, here’s everything you need to know about the nutrient-sucking, little white cotton-like-critters that could cause you a lot of headaches if you’re not careful.
What Are Mealybugs?

If you’ve ever noticed a weird cotton like substance growing on your plants, chances are they didn’t just leave after wiping them off. It’s more likely that they came back overnight, again and again. If you head to your local garden center to ask an expert, you’ll get a wide-eyed look and the word “Mealybugs!”. It’s no joke folks, Mealybugs aren’t easy to get rid of. The kill every plant they land on and send shivers down our experts backs!
Though, not harmful to humans and pets, they can be life threatening to their host plant, sucking up all the nutrients your plants need to survive. If you’re brave enough to take a closer look at them through a microscope or google images, you’ll find that they look awfully similar to potato bugs but with more legs.
Like many bugs, Mealybugs start their lifecycle in a cocoon form. In just three days they hatch into tiny crawling insects with the female Mealybugs taking the form of larger potato-bug-like critters ready to reproduce without mating. While rare male Mealybugs take form as flying insects.
How did I get Mealybugs?

Mealybugs are attracted to nitrogen rich plants and moisture. If you have a tendency to overwater your plants, it’s a good idea to water as little as you can to make them as uncomfortable as possible.
Not only do Mealybugs love houseplants but like many insects they enjoy common produce from grocery stores and flowers, which is a good reminder to wash your food before putting them away and to check your flowers before bringing them home.
When shopping for new houseplants, be sure to check them over. Once a single plant is infested, it is very easy for Mealybugs to transfer host plants. If you spot any signs of Mealybugs from a new plant, be sure to return it and notify the business of the reason for return so that they can dispose of the plant and check on their nursery.
Tip: Mealybugs aren’t just interested in indoor plants, they can often be found outside during warmer temperatures. Be careful when bringing plants inside from the outdoors, as it’s a good opportunity for them to extend their lifespan.
How Do You Get Rid of Mealybugs?

There are a few methods to taking care of a Mealybug infestation but non of them as as easy as you might hope. Treating mealybugs can take time but with enough care, your plants will thank you for your efforts. Here are a few favourite methods to taking care of Mealybugs.
1.) Dish Soap – Mix 1 tablespoon of dish soap with a quart of water, apply the spray to the leaves and the soil of your plant. This treatment will take some time and should be applied every couple days.
2.) Peroxide – Using a Q-tip swab the insects off the leaves of your plant to ensure all eggs are sterilized to prevent hatching.
3.) Spray – If you’re time sensitive and want to treat your Mealybugs immediately, try Safers End All Ready To Use Spray. Safe to use on all types of plants and highly effective for treating many types of bugs.
Tip: For an effective treatment, shower your plants clean of the effected soil and treat the roots directly. Place your plant in new soil, and treat it again. Since mealybugs live right at the root of the plant, this will help take care of them straight at the source.
Have a suggestion or question?
Let us know at info@wildwoodoutdoorliving.com.
Sign up here for more blogs dedicated to better gardening!


