by Wildwood Outdoor Living | Aug 19, 2022 | Gardening 101
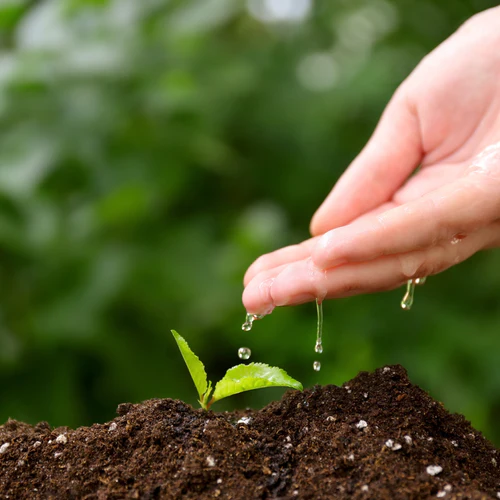
Who knew Canada could get so hot!? With the summer we’ve been having, it’s hard to find the energy to get much work done. During times like these, you might find your garden is happy and healthy one minute and then droopy and sad the next! If the heats getting to you, and your garden, don’t worry! In this weeks blog, we’re here to help keep your garden hydrated and healthy during hot times.
Watering Times

When deciding the best watering times for your garden, you first want to start by checking with your local municipality. Each neighborhood is assigned a watering schedule to ensure adequate usage. These guidelines are crucial for keeping your water bill down and contribute to environmental initiatives for lowering our carbon footprint.
Morning: When possible, watering your plants in the early morning is always the best option for beating the summer heat. In the early morning, your plants can have more time to absorb the water through the soil before the sun comes to evaporate it. We recommend the earlier, the better, no later than 10 am.
Afternoon: In most places, the sun is at its peak around 12pm. To keep your plants hydrated during scorching summer temperatures, it’s crucial to never water your plants during peak sunshine hours. Watering your plants during these hours won’t allow your plants to absorb enough water before it gets evaporated. If the afternoon is the only time you have to water your plants, we recommend using a drip irrigation system to ensure a slow and steady watering solution to prevent water evaporation.
Evening: The best alternative to watering your plants in the morning is to water them in the evening! Watering your plants in the evening will allow them the proper time to absorb water from the soil up their roots before the sun comes up. When sticking to an evening watering routine, it’s essential not to overwater your plants, as this could cause fungal growth. Also, try not to water them too late into the evening. Giving them as much evening sun as possible will help to prevent water logging.
Watering Tools

Mulch: Mulching your garden beds is a great way to retain moisture by keeping your soil cooler for longer. Allowing your plants to absorb more water while also preserving water. Just apply 2-3 inches of mulch to the top layer of soil and water as needed. Be sure to reapply throughout the season.
Water bags/Rings: Water bags are a sustainable way to provide your trees with sufficient watering for 5 to 8 hours, never overwatering or underwatering your trees. If you plan on taking a summer vacation, water bags are the perfect solution to keeping your trees hydrated, especially for new trees that need to establish new solid roots.
Self-watering Stake: Whether your potted plants are outdoors or indoors, summer temperatures significantly affect container plants. Without a deep rooting system built into the earth, container plants can dry out quickly and die. While timing your watering will help, it may not be enough to keep your plants hydrated. For optimal hydration, self-watering stakes are the perfect solution for slowly releasing water for container plants. Giving you more time between watering while also stabilizing moisture levels.
Moisture & PH Meter: When you doubt whether your plants are being over-watered or under-watered, using a Moisture Meter will help you stay on track. After all, we don’t always get the same amount of sun each and every day. Simply stick the moisture meter in the soil to determine the amount of water required and water as needed.
Tips & Tricks

Depth: Water deeply & right at the roots. Soaker hoses with wand attachments work great! Watering deeply ensures you’re getting right to the roots. It’s better to water deeply, less frequently when possible. We also recommend watering right at the base of the plant. Not only is it a more effective way to hydrate your plants, but letting water sit on your plants’ leaves in the hot sun can cause damage and scorching.
Over-watering: Just because it’s toasty out there doesn’t mean your plants want to be drowned! Keep an eye on your soil. It should never be so wet that water is pooling, and you should allow some time to dry a little between watering so the roots can get oxygen.
Clay-rich soil: Depending on your plant’s needs, using clay-rich soil is a great way to retain moisture for longer. Good clay-rich soil can have better expanding properties, which will allow your soil to hold water longer and more evenly.
Slow release or drip: One of the most essential tips and tricks when it comes to keeping your plants hydrated is ensuring that they get the water you’re giving them! Often times we can be in a rush to water our plants, which can result in a runoff – meaning that the water has rolled off away from the plant. To ensure you’re watering right down to the root of your plants, we recommend using a drip irrigation system or slowing down and watering your plants evenly and all around the plant. This will also produce better-quality plants by preventing one-sided root growth.
For more tips and tricks on keeping your plants hydrated this summer, check out the latest episode of Get Up and Grow, with our President Gord Nickel Gardening Water Tips for Summer below!
Have a suggestion or question?
Let us know at info@wildwoodoutdoorliving.com.
Sign up here for more blogs dedicated to better gardening!
by Wildwood Outdoor Living | Jul 21, 2022 | Gardening 101
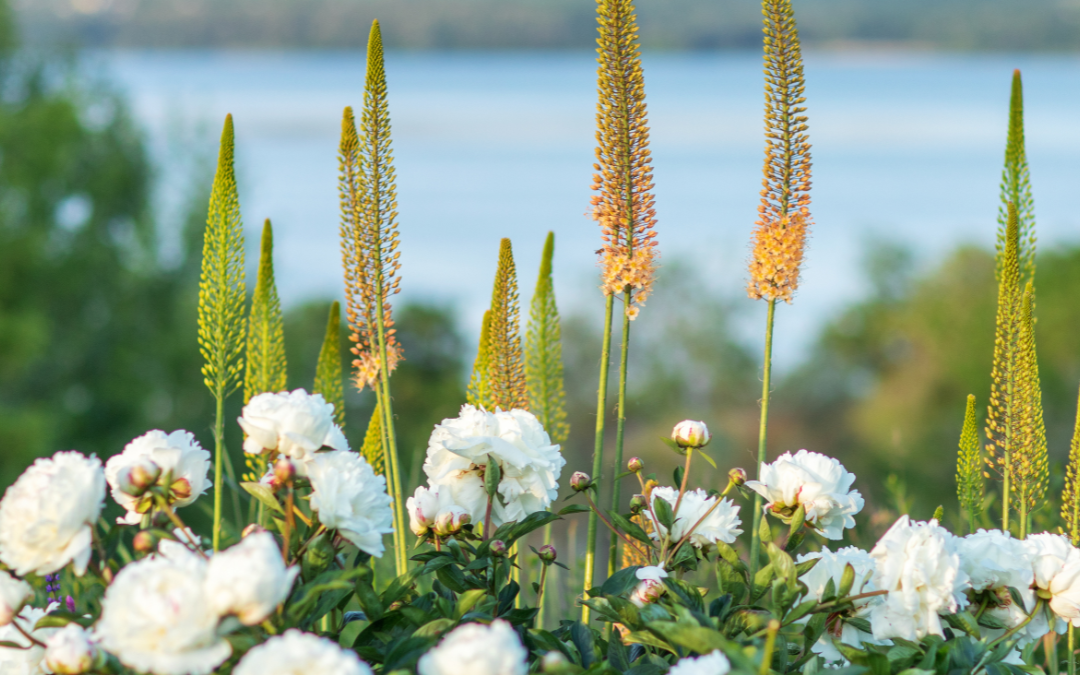
Also known as Foxtail Lilies, Desert Candles and King’s Spears, Eremurus are strikingly unique members of the Asphodelaceae family. Originating from all over the world in Asia, China, Turkey, and Europe. They can reach up to seven feet tall in varieties of whites, pinks, yellows, and oranges. Derived from the Greek meaning “tall” and “solitary” Eremurus symbolize endurance.
Varieties of Eremurus

With over 50 different variations, there are four common types of Eremurus that can be found commercially available for growing in your home garden.
Eremurus Himalaicus – Produces white flowers, reaching up to four feet tall.
Eremurus Robustus – The tallest variety of Eremurus, producing pink or white blooms that climb up to ten feet tall.
Eremurus Stenophyllus – The shortest variety of Eremurus, producing yellow flowers that grow from 2ft to 3ft tall.
Eremurus Isabellinus – A hybrid Eremurus bred between Emerurus Olgae and Emerus Stenophyllus. Also known as “Cleopatra” with copper flowers reaching 4ft tall.
At Wildwood Outdoor Living Centre, you can find the following varieties that have become increasingly popular year after year.

Eremurus Copper Cleopatra Tops


How To Grow Eremurus

While deterring unwanted garden pests such as deer and disease, Eremurus attracts beneficial pollinators like butterflies and hummingbirds. They are easy growers that require little maintenance while creating a big impact. Plus, there’s nothing quite like them when it comes to their performance indoors as cut flowers and in containers.
When planting Eremurus, it’s important to know that these garden giants require space to grow. Placing them at the back of garden borders is a popular way to prevent overcrowding while taking advantage of their enormous height for added depth. When given the space they need, Eremurus pair beautifully with peonies, roses, allium, and iris. To grow Eremurus at home, follow the care guide below to see if your home garden meets their growing requirements.
| SUN |
Full to Partial Sun |
| ZONE |
Zones 5 – 8 |
| DEER RESISTANT |
Yes |
| FRAGRANT |
No |
| BLOOM TIME |
Late spring to early summer |
| HEIGHT |
Up to 10 feet tall |
| PLANTING SPACE |
Plenty of space, 8″ is recommended |
| PLANTING TIME |
September until Frost |
Cutting Eremurus

To get the most out of your cut Eremurus, cut them at the base of the stem on an angle and place them in warm water with sugar or plant food. As the flowers wither from the base upward, remove any dead foliage and replace the water as soon as it isn’t clear.
Don’t forget to pre-order your Eremurus now, to guarantee your favourite striking garden giants this fall!
Have a suggestion or question?
Let us know at info@wildwoodoutdoorliving.com.
Sign up
here for more blogs dedicated to better gardening!

by Wildwood Outdoor Living | May 20, 2022 | Gardening 101
While it may seem like a tree with its tall stance and long reach, Wisteria is a fast-growing vine capable of growing in many ways. Famous for its ability to cascade pergolas, archways and trellises. Wisterias drape shades of purple, pink, white and blue flowers creating a beautiful floral shelter wherever it grows.
About Wisteria
Ordinating in Asia, Wister belongs to the legume family. The leaves and the flowers have been cultivated for centuries for teas and stems to make paper. It is essential to know that the pods produced by Wisteria are highly toxic if consumed yet the flowers remain edible. You can find Wisteria in various variations of blooms and colours. However, there are two primary varieties of Wisteria.

Chinese Wisteria – Also known as Wisteria Sinensis, Chinese Wisteria originates from China. As a more extensive variety of Wisteria with strong climbing abilities, Chinese Wisteria is known to be an invasive species across many states. Reaching up to 60 ft tall and 15 ft wide, Chinese Wisteria can also grow indoors, reaching approximately 2 ft tall as a Bonsai Tree. Chinese Wisteria is the most popular variety of Wisteria available in shades of white, blue, pink and purple, all with different scents.

Japanese Wisteria – With more prominent and more scented blooms, Japanese Wisteria originates from Japan. They grow up to 35 ft tall and 25 ft wide. Japanese Wisteria uses surrounding objects like trellises to spread. With varieties of blooms in pink, white, blue, and purple shades. With proper care, this vigorous grower can reach up to 10 feet tall in just one year.
Planting Wisteria

Canadian Wisteria
In Canada, Wisteria can withstand a wide variety of temperatures allowing it to grow happily in zones 4 through 9. Initially, Wisteria will require protection from Canada’s harsh winters, but once matured, it will be able to take on the cold. Once planted, Wisteria can take up to 5 years to produce blooms. Beautiful Wisteria blooms can then appear for four to five weeks in and around May. Depending on the variety of Wisteria and growing conditions, a second bloom can sometimes occur in August!
Supporting Wisteria
When planting your new Wisteria vine, give your vine plenty of space from any objects you do not want it to climb on while also giving it the support it needs to grow to its fullest potential. If you choose to use a pergola, trellis or an arbour, it is crucial to ensure the structure’s weight is strong enough to host the Wisteria. A rule of thumb is to use support beams that are a minimum of 4 x 4 inches and made from wood or metal. To assist with the direction of growth, use strong garden twine while it matures to the top of your structure.
Wisteria Care
For more tips and tricks on how to grow Wisteria at home, check out the latest episode of Get Up and Growth with our President, Gord Nickel on Chek News below!
Have a suggestion or question?
Let us know at info@wildwoodoutdoorliving.com.
Sign up
here for more blogs dedicated to better gardening!
by Wildwood Outdoor Living | Apr 18, 2022 | Gardening 101
Most gardeners would agree that one of the best methods of growing happy and healthy plants is the prevention of unwanted pests and diseases. A fantastic way to prevent disease and unwanted pests is to grow plants that complement each other. Planting compatible plants together prevents problems, but it can also introduce many excellent benefits to help your plants thrive. If you’re new to companion planting, you’ll want to grab a pen and paper to take down a few of these great suggestions for pairing up your plants.
What is Companion Planting?

Companion planting is the process of planning and implementing a garden that will create a beneficial natural ecosystem to help our plants grow. We can introduce beneficial pollinators while deterring unwanted pests like Aphids, Flea Beetles, Hornworm, Whitefly and more. Companion planting can is a great way to add more nutrients to the soil. It can ensure your plants rooting systems aren’t fighting for nutrients. It can also provide shade for smaller plants that need it and more. Companion planting can even create new and enhanced flavours for vegetables and herbs!
Pests & Pollinators

When planning your garden, it’s a good idea to consider the kinds of pests attracted to the plants you’ve chosen. By carefully reading the package or googling the plant, you might discover that certain plants are susceptible to certain pests and diseases. To avoid introducing these pests and diseases to your other plants, it’s best to plant them further away or pair them with a plant that can help disguise, distract or introduce prey to these insects. Planting garlic chives near your carrots can disguise their smell from susceptible pests like Rootfly and beetles. Or, depending on the plant, introducing fennel in a planter to your garden can attract Hornflies that eat Aphids. The combinations are endless, so be sure to do your research before pairing your plants together.
Soil & Nutrients

Every plant has its own rooting system, which allows them to absorb nutrients. When planting your garden, it is essential to know what your plants’ root system looks like to ensure that your plants aren’t fighting for nutrients. For example, although carrots and radishes are both root vegetables, carrots develop their roots much later than radishes. Planting these two together will provide one another with enough space and similar growing conditions that they both need. Alternatively, planting similar root structures like carrots and potatoes together will create problematic growing conditions leaving both plants unsatisfied.
Growth

Generally speaking, when spacing your plants, it’s essential to know how much room each plant requires to prevent overcrowding. Alternatively, pairing certain plants together is a great way to benefit your plant’s growth habits. When paired together, corn provides a natural trellis for beans. While beans provide fixed nitrogen levels in the soil for corn. You can use your plants to create a natural trellis, but you can also use them for protection against harsh UV rays for plants like lettuce. There are endless combinations to consider when planting for growth, so do your research before planting!
Flavour

Looking to create some unique flavours in the garden this year? An excellent way to build flavour is by following a few tried and true companion combinations for added flavours! A common practice is to pair herbs with their compatible vegetable friends. When planted with basil, peppers absorb some of the basils’ strong flavour through the soil, creating a unique pepper/basil taste! Or, plant chives with tomatoes and carrots for a boost of flavour while repelling Aphids and Beetles.
Plant companions

Companion planting has been around since the beginning of time. It can take many years to perfect your perfect combinations with unlimited possibilities. Lucky for us, many successful suggestions have been shared over time to help us make the right choice from the start. Below are some of the best tried and true companion combinations to help you create your best garden yet.
|
Plant
|
Companion
|
Why
|
|
|
|
Place potted mint near plants that are often attacked by smell-driven insects to disguise their smell.
|
|
|
Fruit trees, Beets, Dill, Kale, Spinach, Potatoes, Eggplants, Tomatoes,
Peppers, Cabbage, Cauliflower, Broccoli, Geranium, Marigolds, nasturtium |
Effective fungicide deters pests including rabbits/deer. |
| Lavender |
Chamomile, Broccoli, Brussels, Basil, Lemon Balm, Squash, Sage,
Rosemary, Oregano, Onions, Tomatoes, Lettuce |
Attracts pollinators, while repelling unwanted pests like beetles. |
| Wormwood |
Carrots, Onions, Leeks, Sage, Rosemary |
Used as a tea to spray on non-edible plants, or potted beside plants to repel insects like Carrot Fleas. |
| Calendula |
Tomatoes, Asparagus, Peas, Carrots, Leafy Greens, Cucumbers |
Acts as a lure for Aphids and Slugs. Calendula also repels Whitefly while attracting benefits like Lacewigs, Hoverflies and Ladybug. |
| Sage |
Carrots, Tomatoes, Parsley, Strawberries, Rosemary, Beans,
Thyme, Nasturtiums, Oregano, Broccoli, Brussels |
Enhances flavours deters pests like slugs, and increases nitrogen in the soil. |
| Borage |
Tomatoes, Cabbage, Strawberries, Squash |
Improves strawberry flavour while deterring tomato Hornworm and cabbage worms. Used to attract pollinators to squash, melons and cucumber. |
| Thyme |
Broccoli, Brussels, Strawberries, Asparagus |
Used as a tea and extracted onto cabbage plants to deter Whitefly. Thyme can also deter blackflies from roses. |
| Cucumber |
Asparagus, Beans, Broccoli, Brussels, Celery, Corn, Dill,
Kohlrabi, Lettuce, Onion, Peas, Radish, Tomatoes, Sunflowers |
Sunflowers and Corn are both used by cucumber as trellises. Nasturtiums improve cucumbers’ flavour while Dill distracts pesky pests. |
| Carrots |
Broccoli, Brussels, Chives, Leeks, Lettuce, Onions, Peas,
Peppers, Pole Beans, Radish, Rosemary, Sage, Tomatoes |
Benefits depend on the combination of plant pairings. Added taste and soil fertility is among the top best pairings. Be careful on placement as root plants can compete for nutrients. |
Have a suggestion or question?
Let us know at info@wildwoodoutdoorliving.com.
Sign up
here for more blogs dedicated to better gardening!
by Wildwood Outdoor Living | Apr 8, 2022 | Gardening 101
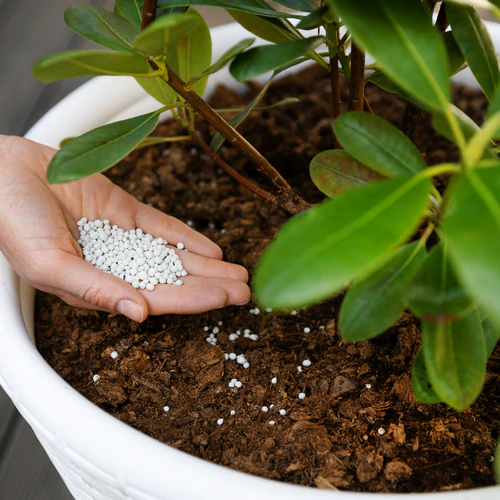
Whether you’re new to gardening or you’re a seasoned professional. Gardening is a world of its own, where we as gardeners get to learn and grow constantly. From being in the industry for over 40 years, we’ve learned a thing or two regarding gardening. We’ve come to understand that fertilizers are super important but not the easiest to understand. Don’t worry; we’re here to help make feeding your plants as easy as 1-2-3.
What is Fertilizer?

What happens when you give your plants the perfect amount of sunlight and water, but they’re still not happy? You feed them nutrients! Plant fertilizer is the best way to provide plants with the nutrients they need to grow healthy and robust, especially after being removed from the ground and placed in a container. Even if they haven’t been removed from the ground, the nutrients your soil provides to your plants are never guaranteed. Using Fertilizer is the best way to ensure your plants are getting a balanced diet to perform at their best.
Why use Fertilizer?

Improving your plants healthy with fertilizer leads to many benefits. Some of those benefits include:
- Increase pest tolerance
- Improved yielding
- Faster root development and growth
- Improved colour for leaves and blooms
- Stronger, more tolerant straws and stocks
- Improved water intake
- Added nutrients for limp container plants

When choosing your Fertilizer, it’s essential to know what you’re looking for. Each Fertilizer has its unique combination of nutrients that can be effective or dangerous to your plants. The Fertilizer you choose should be specific to the plants you’re growing, as every plant has its own needs. When browsing through the fertilizer section, you’ll notice there is a fertilizer for everything and more. Be sure to consider the following before making your decision.
Fast release vs. Slow release
When choosing the best Fertilizer for your plants, two important things to consider are to know whether you’re looking for slow-release Fertilizer or fast-release Fertilizer.
Fast Release Fertilizer – A liquid fertilizer that provides nutrients to your plants quickly. Providing them with a couple of weeks of nutrients to help them thrive. Fast-release fertilizers are fantastic for annuals because they deliver the proper nutrients immediately, allowing your annuals to look their very best for the season. Fast release fertilizers are quickly absorbed and thus require re-feeding more often to keep your plants happy.
Slow-Release Fertilizer – A granular fertilizer that releases a slow and steady amount of food to your plants to help them grow healthy and robust plants throughout all growing stages. Feeding your plants with a slow-release fertilizer will allow you to grow healthy roots over a more extended period, resulting in vigorous, healthy plants year after year!
What do the numbers mean?
When shopping for plant fertilizer, you’ll notice a sequence of numbers. These numbers indicate the total value of nutrients that the plant fertilizer delivers. The first number indicates the percentage of Nitrogen. The second number indicates the percentage of Phosphorus. The third number is the percentage of Potassium. Here is why each of these nutrients is vital for optimal plant growth.
Nitrogen: Nitrogen is essential for plants to absorb sunlight, producing sugar from water and carbon dioxide. This number indicates the nutrients needed for healthy leaves and colour.
Phosphorus: Phosphorus is used by plants to store and transfer energy efficiently. This number indicates the nutrients needed to produce flowers, fruit and roots.
Potassium: Potassium is used by plants to move nutrients and water throughout the plants body. Delivering all the protein and nutrients where they’re needed.
An example: of how these formulas are displayed would be ” Bone Meal 2-13-0″.
Types of Fertilizers
| Fertilizer |
Nutrients |
Uses |
| Rose Food |
6-18-18 |
Important trace elements for large, abundant, beautiful blooms |
| Bone Meal |
2-13-0 |
The elemental makeup translates into strong roots, and its gradual breakdown gives your plants plenty of time to tap into its potent (yet cool) nutrient reserves. |
| Fruit & Berry Food |
7-21-18 |
Fruit & Berry Fertilizer contains the macro and micronutrients needed by your fruit trees, small fruits, and vining fruits to produce solid and sustained growth, a high bloom count, and strong, well-developed fruit. |
| Palm & Tropical Food |
9-3-9 |
Specially formulated for all outdoor and indoor tropicals, including hardy palms, bananas, houseplants and more! Feeds continuously for 4-6 weeks. |
| Power Bloom Food |
10-40-25 |
Mix Power Bloom in your watering can every 10-14 days and stand back! Your hanging baskets, planters, and even indoor flowering plants will look as though they have more flowers than foliage! |
| Rhodo & Azalea Food |
6-12-8 |
This formula includes trace elements essential to root growth and allows for better flower colour and contrast. Use this formula on any acid-loving plants including Hydrangeas, Skimmia, Pieris, Viburnums, etc! |
| Vegetable & Flower Garden Food |
12-16-12 |
Designed for powerful all purpose formula to reduce waste and provide an organic-based balanced diet for your garden edibles. |
| All-Purpose Plant Food |
20-20-20 |
Complete, fast-acting nutrition for vigorous growth on all types of plants. Use on potted plants (indoor and out), hanging baskets, and ornamental trees and shrubs. |
| Transplanter Food |
5-15-5 |
Not only is Transplanter effective at reducing transplant shock from seedling veggies and flowers to large shrubs and trees, but it’s also a great defence when you observe signs of stress on your existing plants. |
| Evergreen Food |
14-7-14 |
Professional quality evergreen, tree, and hedge fertilizer with 2% iron for quick greening. |
| Perennial & Vine Food |
8-12-16 |
Organic-based to help promote dark green foliage year-round. |
| Container Food |
14-14-14 |
Perfect for hanging baskets, indoor plants, and container gardening. |
Common Mistakes

As you can tell there are many options when it comes to choosing fertilizers. To help narrow down your choices, it’s not only important to know what you’re looking for but it’s also important to know what to be careful of. When fertilizing, be sure to consider these common mistakes.
- If you are planning on consuming your plants (fruits, vegetables, herbs) be sure to go with an organic-based fertilizer for healthy, chemical-free digestion.
- When choosing your fertilizer, try to stick to one. Combining fertilizer can result in killing your plants by creating blockages from mixing chemicals.
- Over-fertilizing can seem great but it isn’t. When over-fertilizing your plants, you could possibly create a healthier glow but unfortunately, this can create excessive sap for insects to ingest. This will also lead to fertilizer burn which leads to wilting and death.
- Using the wrong fertilizer can be done by applying fertilizer at the wrong time or to the wrong plant. This could result in scenarios where you may get lush green leaves, but no yields.
- Not enough water! It is important to read the instructions on the plant fertilizer you choose. Not providing enough water is a common mistake that can lead to fertilizer burn.
For more tips and tricks on selecting the best plant fertilizer for the season, check out the latest episode of Get Up and Grow, with our President Gord Nickel.
Have a suggestion or question?
Let us know at info@wildwoodoutdoorliving.com.
Sign up here for more blogs dedicated to better gardening!


by Wildwood Outdoor Living | Mar 10, 2022 | Gardening 101
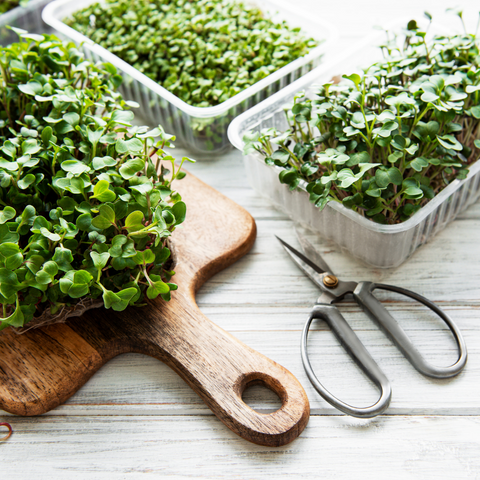
Microgreens are kind of like the new kid on the block when it comes to seeds, we’ve all heard of them but do we know that much about them? After reading this blog not only are you going to know what microgreens are and why they’re amazing! But you’ll learn everything there is to plant your very own at home!
About Microgreens
Not quite a green, not yet a sprout. Microgreens are young seedlings of vegetables and herbs that get harvested when they’re only 1-3 inches tall. After only 2-3 weeks microgreens are harvested for their concentrated nutrients and robust flavours.
Depending on the variety, microgreens can have up to nine times more nutrients than mature vegetables! A great way to get your daily dose of copper, iron, magnesium, zinc, potassium, calcium, vitamin C…the list goes on!
Microgreens can be enjoyed cooked but are mostly prepared raw to keep their full nutritional value. A few tasty ways to enjoy microgreens are on sandwiches, salads, smoothies, burger toppings, pizza toppings, salsas and more!
Varieties of Microgreens

Whether you’re looking to add a spicy, sour, peppery or bitter taste to your dishes, microgreens come in a wide variety of flavours and variations. To help you discover what each microgreen has to offer, we’ve created a helpful cheat sheet that’s full of flavour profiles and nutrients.
Variety
|
Flavour
|
Nutrients
|
| Alfalfa |
Nutty & mild flavour with a crunch. |
Rich in vitamins A, B, C, E & K. calcium, folic acid, magnesium, phosphorus, potassium, sodium, and zinc. |
| Arugula |
Softly sweet, tangy, peppery, nutty and earthy. |
Rich in vitamins A, B, C, and E, as well as calcium, iron, magnesium, niacin, phosphorus, potassium, and essential amino acids. Arugula microgreens contain up to 25% protein! |
| Beets |
Mild spinach-like flavour. |
Rich in Vitamin B6, C, Folate, Iron, Magnesium, Manganese, potassium and copper. |
| Brown Mustard |
Intense flavour with some heat. |
Rich in vitamin B6, A, C, E, Omega-3, Fatty Acids, Copper, Phosphorus, Folate, Manganese, Zinc, Folate, Niacin, Iron, Potassium, Calcium. |
| Chard |
Softly salty, earth with hints of veggie flavour. |
Rich in vitamins K, A, C, full of protein, dietary fiber, and antioxidants. |
| Cilantro |
Citrus and grassy flavour. |
Rich in vitamins A, B, C, E, K, Calcium, Iron, Potassium and Zinc. |
| Mung Bean |
Slightly sweet flavour similar to green peas. |
Rich in vitamin B, C, K and high in fiber. |
| Fenugreek |
Refreshing, spicy, grassy, curry-powder-like. |
Rich in vitamin A, C, high in fiber, folic acid and thiamine. |
| Green Peas |
Fresh, crunchy, slightly bitter. |
Rich in vitamin C, A, high in fiber, |
| Radish |
Peppery, radish-like taste. |
Rich in vitamin c, B1, B6, copper, iron, magnesium, folate, zinc, dietary fiber. |
| Red Clover |
Mild and fresh, nutty and sweet. |
Rich in vitamin A, B-12, C, E and K. High in protein, minerals, iron, magnesium and silicon. |
Planting Microgreens

Growing microgreens at home can be a fun experience for everyone including kids! Each variety includes its growing instructions and conditions. Though, for the most part, microgreens love bright sunlight and plenty of water. Microgreens take up very little space, making the kitchen or windowsill a popular place to grow them.
1.) Container – Using a shallow container with drainage, fill the bottom with a few centimeters of seedling soil.
Note: Be sure to use sterilized soil to prevent pathogens and mold.
2.) Sowing – If planting small seeds, sprinkle seeds evenly on top of the soil. Medium-large seeds should be inserted into the soil, lightly covered by soil and evenly spaced.
3.) Water – Using a mister, soak the seeds well from above. Alternatively, seeds can be soaked from the bottom in the sink and removed to drain. Keep microgreens consistently moist, not wet.
Harvesting Microgreens
Microgreens are fast growers. In just 2 weeks you’re ready to harvest your first batch! Although regrowth isn’t likely, the leftover matter from growing microgreens is highly nutritious for other plants. To harvest your microgreens, it’s important to know the difference between True Leaves and Cotyledons.
Cotyledons are the surface embryos of microgreens that look similar to baby leaves. These can be harvested but will produce much less. True Leaves are the final form of the leaf that resembles a fully developed leaf. For a healthy harvest, cut your microgreens when they form True Leaves. Be sure to cut the bottom of the stem to get as much as you can.
Do not allow your microgreens to develop munch longer after the plant develops its True Leaves. Microgreens will overdevelop, turning yellow, losing their flavour and nutrients.
Storing Microgreens

Once you have cut your microgreens, you can expect to keep them happy and healthy in the fridge for up to 2 weeks! Plenty of time to add them to sandwiches, salads, smoothies and more! All you have to do is place them in a baggie or container with a wet paper towel to keep them hydrated. Looking for more microgreen options? Check out our new Microgreen collection here.
Have a suggestion or question?
Sign up
here for more blogs dedicated to better gardening!