by Wildwood Outdoor Living | Dec 12, 2023 | Gardening 101
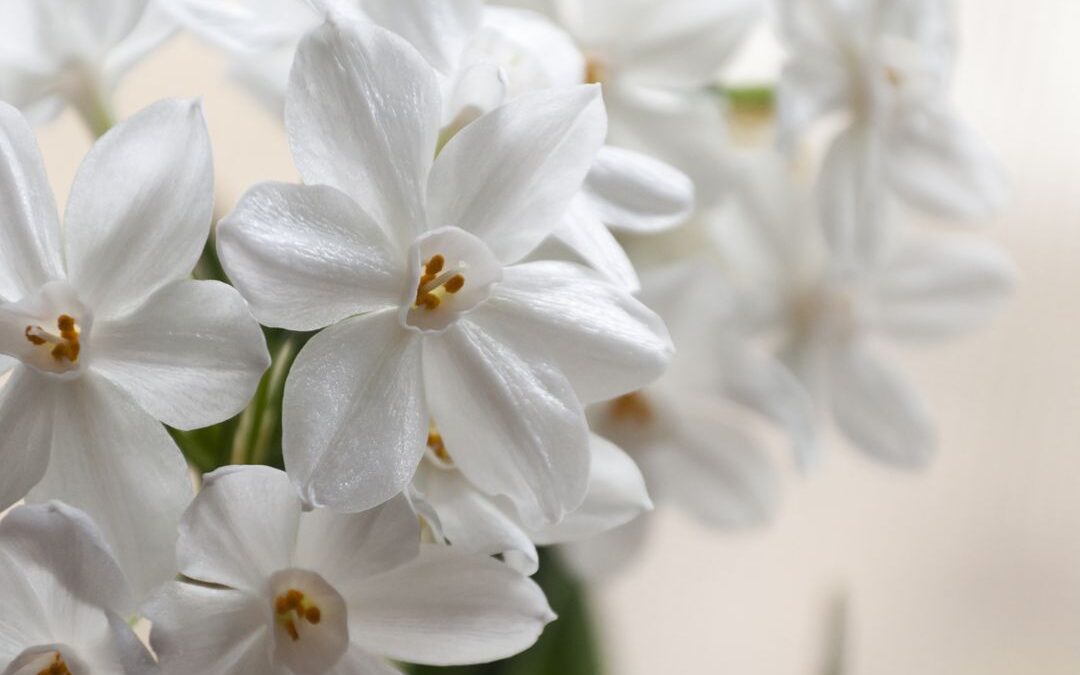
Indoor Paperwhites 101
If you’re looking for a way to brighten up your indoor space and enjoy the beauty of nature even when it’s snowing outside, then indoor paperwhites are the answer. In this week’s blog, we’ll explore everything you need to know about indoor paperwhites – from how to plant them properly to tips on caring for them throughout their blooming period. So get ready to discover the joy of having fragrant flowers grace your home this winter season with these beautiful indoor winter flowers – the lovely and enchanting indoor paperwhites.
About Indoor Paperwhites
Indoor paperwhites are beautiful flowering plants that bring a touch of elegance and freshness to our homes, especially during the winter months. These delicate flowers are scientifically known as Narcissus papyraceus and typically originate from regions such as Spain and Portugal, where they thrive in mild climates. Now they have been cultivated for centuries and have become a beloved addition to indoor gardens worldwide.
One of the fascinating aspects of paperwhites is their ability to bloom during the winter season. Unlike other flowering plants that require warm weather and ample sunlight, paperwhites have the unique characteristic of blooming indoors when temperatures drop. This makes them a popular choice for adding colour and vibrancy to our homes during the colder months.
How to Grow Indoor Paperwhites

Growing paperwhites can be a delightful and rewarding experience, as these elegant flowers bring beauty and fragrance into any indoor space. To ensure successful growth, it’s essential to pay attention to the soil, bulb depth, and container size.
Planting Indoor Paperwhites
1.) When it comes to soil, paperwhites prefer well-draining options such as potting soil or a mix of peat moss and perlite. Avoid using heavy garden soils that can retain excess moisture, as this may lead to root rot.
2.) Bulb depth is another crucial factor in growing paperwhites. Ideally, place the bulbs in the container with their tips just above the surface of the soil. This allows them enough room for root development while ensuring stability.
3.) Choosing the right container size is also important for proper growth. Select a container that provides enough space for multiple bulbs without crowding them. This allows each bulb to grow and bloom freely without competing for resources.
Watering Indoor Paperwhites
When it comes to watering your potted paperwhites, it’s important to strike a balance. Overwatering can lead to rotting bulbs, while underwatering can hinder their growth. Aim to keep the soil evenly moist but not waterlogged. A good practice is to water them when the top inch of soil feels dry to the touch.
Sun Requirements for Indoor Paperwhites
Sunlight requirements play a crucial role in the development of paperwhites. These plants prefer bright, indirect light, so placing them near a sunny window or providing them with filtered sunlight will help them flourish. Avoid exposing them directly to harsh sunlight as it may cause leaf burn and cold-drafty windows.
Temperatures for Indoor Paperwhites
Maintaining suitable temperature conditions is also vital for the well-being of your indoor paperwhites. They thrive in cooler temperatures ranging from 50°F to 70°F (10°C to 21°C). Keep them away from drafts or heat sources such as radiators or vents that could disrupt their growth.
Common Issues with Indoor Paperwhites and How to Solve Them
Indoor gardening can be a rewarding and fulfilling experience, but it’s not without its challenges. If you’ve noticed yellowing leaves in your paperwhite plants or stems flopping over, don’t worry – you’re not alone. These common issues can be easily troubleshooted and resolved with a few simple tips.
1.) Yellowing leaves in paperwhite plants are often a sign of overwatering. These delicate plants prefer moist soil, but too much water can lead to root rot and nutrient deficiencies. To solve this problem, make sure you’re allowing the soil to dry out slightly between waterings. Additionally, ensure that your pot has proper drainage to prevent water from sitting at the bottom.
2.) Another common issue faced by indoor gardeners is stem flopping in paperwhite plants. As these plants grow tall and produce beautiful blooms, their stems can become top-heavy and bend under their weight. To prevent this, provide support for the stems by gently tying them to stakes or using plant supports like bamboo sticks. This will help keep the stems upright and maintain their aesthetic appeal.
3.) Lastly, avoiding overwatering problems is crucial for the health of your paperwhite plants. These bulbs thrive in well-draining soil that allows excess moisture to escape easily. Be mindful of how often you water your plants and ensure that the soil is never excessively wet or soggy. It’s better to underwater than to overwater when it comes to paperwhites.
By following these troubleshooting tips and implementing preventive measures, you’ll be able to enjoy vibrant and healthy indoor paperwhite plants all year round. Remember, patience and observation are key when it comes to nurturing any plant – so don’t get discouraged if it takes a little trial and error before finding the perfect balance for your green companions!
TIP: Looking for earlier blooms? Try re-chilling the bulbs before planting them. By placing the bulbs in a cool location, such as a refrigerator, for several weeks prior to planting, you can mimic the cold winter conditions that paperwhites require for blooming. This chilling period helps trigger their growth cycle and prompts earlier flowering.
Decorate with Indoor Paperwhites

Indoor flower arrangements can instantly brighten up any space, and when it comes to winter blooms, paperwhites are a popular choice. These delicate flowers not only add a touch of elegance but also fill the air with a sweet fragrance that can uplift your mood. If you’re looking for inspiration on how to decorate with indoor paperwhites in your home or office space, we have some creative and DIY ideas for you. From simple yet stunning floral arrangements to unique ways of incorporating these winter blooms into your existing decor, there are plenty of options to explore.
Indoor Paperwhite Centerpieces
Consider creating a centerpiece using a clear glass vase filled with water and floating paperwhite bulbs. This minimalist approach allows the beauty of the flowers to take center stage while adding a touch of tranquility to any room. Alternatively, you can showcase paperwhites in vintage teacups or mason jars for a charming and rustic look.
Paperwhite Accessories
For those who prefer more elaborate arrangements, try combining paperwhites with other seasonal flowers like holly berries or pine branches. This creates an enchanting winter wonderland effect that is perfect for holiday gatherings or special occasions.
Paperwhites on Wreaths
Another unique idea is to incorporate paperwhites into wreaths or garlands. By intertwining these delicate blooms with greenery, you can create stunning wall decorations that bring the beauty of nature indoors.
Enjoy the Fragrant Beauty of Indoor Paperwhites All Winter Long!

In conclusion, embracing the fragrant beauty of indoor paperwhites during the winter months can bring joy and a touch of nature into our homes. These delicate flowers not only add a pop of colour to any space but also fill the air with their delightful scent.
By following the simple steps outlined in this guide, you can successfully grow and enjoy paperwhites indoors throughout the winter season. Whether you choose to display them in your living room, office, or bedroom, these charming blooms are sure to brighten up even the dreariest of winter days.
So why not treat yourself to the enchanting allure of indoor paperwhites? Create your own little oasis of beauty and fragrance this winter and revel in the soothing presence they provide. Let their delicate petals and captivating aroma transport you to a place of tranquility and serenity.
Indoor paperwhites truly are a testament to nature’s resilience and ability to bring us joy even during colder months. So go ahead, embrace their fragrant beauty and let these lovely flowers remind you that spring is just around the corner.
Have a suggestion or question?
Sign up here for more blogs dedicated to better gardening!

by Wildwood Outdoor Living | Dec 5, 2023 | Top 5 in The Garden
If you find yourself scrambling to complete your Christmas shopping and haven’t quite finished your list, please know that you’re not alone. This time of year can be overwhelming for everyone! If you’re still looking for gift ideas for the special gardener in your life, look no further. We not only understand the practical needs of gardeners but also have insights into what brings them joy! Check out our top 5 bestsellers for the gardener in your life, this holiday season.
#1 Bestselling Seeds
Discover the perfect seeds that will bring boundless happiness and enthusiasm to the passionate gardener in your life. By gifting these highly coveted seeds, not only will they feel a sense of anticipation, but you may also have the chance to enjoy the wonderful benefits together!
Bestselling Herb Seeds

A wonderful herb that boasts an array of fantastic qualities. This variety is certified organic, ensuring pure and wholesome goodness. It is packed with essential vitamins A, C, and K, providing valuable nutrition for our bodies. Not only is it easy to grow, but its heirloom status guarantees a rich heritage. The huge dark green leaves are not only visually stunning but also bursting with flavor. Prepare to be delighted by the versatility this herb offers – its uses in Mediterranean dishes are endless. But there’s more! This continental Parsley also contains a high level of iron and Vitamin C, making it a nutritious addition to any diet. Each packet contains approximately 750 seeds, giving you ample opportunity to cultivate your very own parsley garden.
Bestselling Flower Seeds

Wild Bergamot
The wild bergamot is truly a delight for pollinators, with its high attractiveness to them. Its distinct flavor resembling that of Earl Grey tea adds a touch of uniqueness. The flowers of this beautiful plant come in various shades ranging from pink to lavender. It is commonly referred to as bee balm due to its ability to attract bees. Growing up to a height of 60-90cm (24-36″), it adds a lovely presence wherever it is planted.
Bestselling Vegetable Seeds

Peppers, California Wonder
Introducing Peppers, California Wonder – a variety known for its heavy and smooth-skinned fruits. These thick-walled, blocky peppers are considered one of the standards in the world of bell peppers. Not only that, but they also come with open-pollinated seeds, allowing you to continue growing them year after year. With a maturity period of 65-75 days, you can enjoy these delicious peppers in no time at all.
#2 BESTSELLING VINE

Vertical gardening is gaining immense popularity, not just among backyard gardeners but also for those with apartment balconies. It’s truly remarkable how these stunning flowers can bring privacy and a touch of greenery even in small spaces. Among the many options available, Clematis Multi Blue always manages to shine with its exquisite beauty.
This beautiful plant offers a stunning display of fully double flowers or one-of-a-kind single flowers with oversized stamens, reminiscent of C. florida. It blooms from June to September, showcasing 4-6″ (10-15cm) blossoms. With a mature height of 6-9′ (2-3m), this plant belongs to pruning group B2.
#3 BESTSELLING FRUIT PLANT

The amazing Hecker Everbearing Strawberries! These day neutral plants are not only beautiful and lush, but they also produce an abundance of delicious fruit from June all the way to September. With these strawberries, you can enjoy a continuous harvest throughout the entire summer season. The sweet, large, and bright red fruit is truly a treat for your taste buds. Plus, the runners of these plants also bear fruit, giving you even more strawberries to enjoy. And don’t worry about their resilience – these strawberries are very hardy and can withstand various conditions. Experience the joy of gardening with our 10-pack tube of Hecker Everbearing Strawberries. Each plant will bring beauty and bounty to your garden throughout the summer months.
#4 BESTSELLING OUTDOOR FURNITURE

The Adirondack chair has been ergonomically designed, ensuring a deep and contoured seat and back for the utmost comfort you would expect from an Adirondack Chair. It’s available in a wide variety of designer colours that are fade resistant – for all tastes in style. Plus, the chair is completely waterproof, allowing you to enjoy it without any concerns about weather conditions.
#5 BESTSELLING SPRING BULB

Immerse yourself in the beauty of Café Au Lait, a variety that produces an abundance of 9″ sized blooms. These lush plants are perfect for adding elegance to your garden or bringing joy indoors with their exquisite cut flowers. With just one pack, you can give the gift of never-ending beauty this season.
NEED MORE?
You don’t want to miss the latest episode of Get Up and Grow! Discover a wide range of unique gift ideas perfect for the gardener in your life. If you’re feeling overwhelmed with options, consider giving them the gift of choice with our new E-Gift Cards. This way, they can get exactly what they want and need all year round. Wishing you and your loved ones a joyful holiday season. Keep an eye out for more exciting content from Blogs from Wildwood Outdoor Living in 2024!
Have a suggestion or question?
Sign up
here for more blogs dedicated to better gardening!
by Wildwood Outdoor Living | Nov 28, 2023 | news
Oh no, can you believe it’s already December? Time flies! Whether you’re an experienced gardener or just starting out, this month can surprise you with its business. Preparing for a successful growing season requires a lot of effort and planning. Not to worry though, in this week’s blog, we’re here to help by providing a helpful to-do list to keep you occupied throughout December.
-
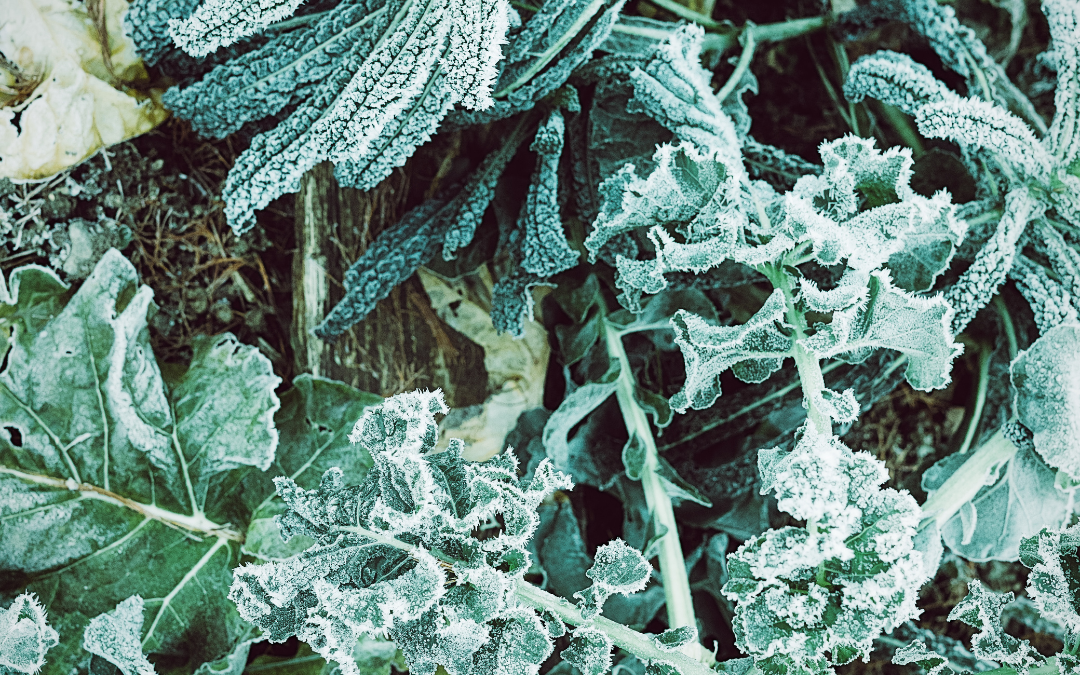
Winter plant protection is providing frost protection for your plants. This can be done by covering them with materials such as burlap or frost blankets, which act as a barrier against freezing temperatures. Additionally, you can create a microclimate around delicate plants by using protective structures like cold frames or cloches.
-
Grow some popular varieties of indoor forcing bulbs like Paper White Narcissus, Amaryllis, and Prepared Hyacinth! These bulbs typically take around seven weeks to bloom and can bring a touch of nature’s beauty indoors.
-
Implement winter mulching techniques: Applying a layer of organic mulch over your soil helps to retain moisture, regulate temperature, and prevent erosion caused by heavy rain or snow.
-
Gently remove the heavy snowfall from branches is crucial as it helps prevent potential damage that can attract pests and disease.
-
When caring for your poinsettia, it’s important to keep in mind the “3 M’s”: moderate bright light, moderate watering, and moderate temperature. Providing just the right amount of these elements will help your plant thrive. Also, be sure to prevent it from being exposed to extreme hot or cold areas.
-
Pay attention to specific needs of different plant species. Some may require pruning or trimming before winter sets in, while others benefit from being moved indoors or into a more sheltered area. Understanding the unique requirements of each plant will help you provide appropriate care during colder months.
-
Cover vulnerable areas; Identify the spots in your garden or landscape that are prone to erosion and protect them with cover crops, straw, or geotextile fabric. These protective layers act as a shield against wind and water erosion.
-
Minimize foot traffic: Reducing foot traffic on your soil during winter is crucial as it can compact the soil particles, making them more susceptible to erosion. Consider using designated paths or walkways to avoid unnecessary damage.
-
Avoid excessive watering; Overwatering can lead to saturated soils that are prone to runoff and erosion. Adjust your watering routine according to weather conditions and only water when necessary.
-
Now is the perfect time to find a beautiful array of spring bulbs! At Wildwood Outdoor Living, you’ll discover the widest selection available both online and in-store. Before you visit, take a moment to plan out your garden and ensure that you provide the ideal growing conditions for your chosen bulbs.
-
Practice proper drainage; Ensure that your landscape has proper drainage systems in place to redirect excess water away from vulnerable areas of the soil. This helps minimize the chances of erosive runoff. Remember that taking proactive measures now will help preserve the health of our soils for future generations!
-
To ensure the health and beauty of holly, it’s important not to cut it during freezing weather. Doing so can cause the berries to turn black. However, you can still enjoy fresh evergreen boughs indoors by cutting them at any time. If you’re looking for long-lasting options, spruce, balsam and cedar boughs are your best choices!
-
Engage in proper shrub maintenance and protect your trees from potential winter damage.
-
If you’re planning to set up your tree at the best possible time, the first week of December is an ideal choice. Furthermore, in case you encounter severe winter weather after Christmas, gradually acclimating your tree to the changing conditions will help protect it from any sudden changes and ensure its well-being.
-
To ensure your real Christmas tree brings joy throughout the holiday season, it’s important to provide it with proper care. By watering the root ball and spraying the branches with “wilt proof,” you can prevent excessive drying and help it stay fresh for five weeks or even longer.
-
Houseplants
a. Provide Sufficient Light; As daylight hours decrease, it’s essential to ensure that your houseplants receive adequate light. Place them near windows that get the most sunlight or invest in grow lights to supplement natural light.
b. Adjust Indoor Plant Watering Routine; With lower temperatures and reduced plant growth, it’s crucial to adjust your watering routine accordingly. Check the moisture level of the soil before watering and avoid overwatering, as this can lead to root rot.
c. Increase Humidity; Indoor heating systems often cause dry air, which can be detrimental to houseplants. Increase humidity levels by placing a tray filled with water near your plants or use a humidifier.
d. Prune and Propagate; Winter is an excellent time for pruning and propagating houseplants. Trim leggy stems or dead leaves to encourage new growth, and take cuttings from healthy plants to propagate new ones.
e. Rotate Plants; To ensure even growth and prevent one side of the plant from leaning towards the light source, rotate your indoor plants every few weeks.
f. Protect from Drafts; Keep an eye out for drafts near windows or doors as they can damage sensitive plants. Move them away from these areas or provide insulation using curtains or draft stoppers.
g. Monitor Temperature; Different houseplants have varying temperature preferences; make sure you’re aware of their specific requirements and keep them within their preferred temperature range.
-
Clear out any debris that may have accumulated in your gutters. By doing so, you are taking proactive steps to maintain the overall well-being of your property.
-
Consider continuing to feed birds throughout the harsh winter months. By providing them with food, you are offering a helping hand during a challenging time when resources are scarce. Your compassion can make a positive difference in their survival and well-being.
-
Keep up the great work with composting! Every little bit you save now will quickly warm up and contribute to a blooming spring. Your efforts are making a positive impact on our environment.
Looking for more to do this December? Check out the latest episode of Get Up and Grow with our President, Gord Nickel for a little bit of inspiration, below.
Have a suggestion or question?
Sign up here for more blogs dedicated to better gardening!
by Wildwood Outdoor Living | Nov 22, 2023 | How To Grow
Growing mushrooms can be a rewarding and fulfilling experience. Whether you are a seasoned gardener or just starting out, learning how to grow mushrooms can open up a whole new world of possibilities in your home or garden. To successfully grow mushrooms, there are a few key factors to consider. In this week’s blog, we’re here to teach you everything there is to learn about growing your very own mushrooms at home!
Growing Medium For Growing Mushrooms

First and foremost, you will need the right growing medium. This can include materials such as straw, wood chips, or sawdust that provide the necessary nutrients for the mushrooms to thrive.
Unlike plants, mushrooms don’t rely on soil and sunlight for their nourishment. Instead, they flourish by breaking down organic matter and extracting nutrients from it. This organic matter, also called substrate, is crucial in mushroom cultivation. The choice of substrate used in growing mushrooms greatly impacts the yield, growth rate, and overall well-being of the mushrooms. Let’s delve into some of the commonly utilized substrates in mushroom cultivation together.
Organic Wheat Bran & Hardwood Sawdust – Hardwood sawdust combines organic wheat bran and hardwood sawdust in a balanced blend. This carefully crafted mix is designed to meet the specific growth needs of Lion’s Mane mushrooms. The organic wheat bran provides a nourishing array of nutrients, while the hardwood sawdust creates a dense and fibrous structure for the mycelium to flourish and colonize.
Manure – Particularly horse manure, is highly valued by gourmet and medicinal mushroom enthusiasts due to its rich nutrients. It contains organic matter that mushrooms thrive on. However, it’s crucial to prioritize safety when using manure. Make sure it has been properly composted and doesn’t contain any pesticides or harmful chemicals. Fresh manure can also introduce unwanted microbes, so proper care must be taken.
Coco coir – Which is made from coconut husks, is a wonderful choice for growing mushrooms because it’s sustainable and renewable. It has the amazing ability to retain water and is often used in conjunction with other substances. Although, when used by itself, coco coir may not provide enough nutrients for certain types of mushrooms. Therefore, it’s recommended to use it as a supplement rather than the sole substrate.
Moisture for Growing Mushrooms

Next, it’s important to create the ideal growing environment. Mushrooms prefer cool and dark conditions with high humidity levels. You may need to invest in a grow tent or create a designated space where you can control temperature and humidity levels, like an aquarium.
Another crucial aspect of mushroom cultivation is choosing the right mushroom variety for your desired outcome. There are countless types of edible and medicinal mushrooms available, each with their own specific growth requirements and flavours.
Once you have prepared your growing medium, created the optimal environment, and selected your desired mushroom variety, it’s time to inoculate your substrate with mushroom spawn. This involves introducing mycelium (the vegetative part of the fungus) into the growing medium to kickstart the growth process.
Throughout the growth cycle, it’s important to monitor temperature and humidity levels regularly. Mushrooms require consistent care and attention to ensure successful growth. Depending on the variety you choose, it may take several weeks or even months before you can harvest your first crop.
Oyster Mushrooms – For the best results, oyster mushrooms thrive in a humidity level ranging from 75% to 95%. Why is this important? Maintaining this higher level of humidity is crucial as it keeps the oyster mushrooms wonderfully moist and prevents them from becoming dry. By ensuring a consistent humidity within this range, you can enjoy plump and succulent oyster mushrooms with an absolutely delightful texture.
Lion’s Mane – Lion’s Mane mushrooms prefer a slightly higher humidity range compared to oyster mushrooms, typically between 85% to 95%. Creating the right humidity level is crucial for the successful growth of Lion’s Mane mushrooms. While it may not be as forgiving as growing oyster mushrooms, it is still relatively straightforward. By using a humidity tent with airflow holes, you can maintain the ideal moisture level needed for cultivating Lion’s Mane. The higher humidity promotes the development of its distinctive long and spiky tendrils, which contribute to its unique appearance and texture.
Lighting for Growing Mushrooms

Although mushrooms differ from plants in their photosynthetic capabilities, light still holds great significance in their growth and development. While plants rely on light for energy, mushrooms utilize it as a means to determine their growth direction and initiate the fruiting process.
Artificial Lighting – In the process of cultivating mushrooms, using a 6500K light is crucial as it mimics the spectrum of natural daylight. These types of lights can be set on a timer to simulate a natural day-night cycle for your mushrooms. This way, they can receive adequate light without being exposed to too much brightness. This nurturing spectrum plays a vital role in promoting healthy mushroom growth, ensuring their upward development and overall proper formation.
Avoid Direct Sunlight – Mushrooms truly flourish in ambient light, preferring the gentle glow that filters through curtains or the soft illumination found in shaded areas. It’s important to protect them from direct sunlight, as this can dry them out and impede their growth. Ensuring they receive indirect light will help them thrive while keeping them shielded from harmful sun exposure.
Fresh Air for Mushroom Growing

Mushrooms, just like any living organisms, need a careful balance of essential elements to grow successfully. One of these crucial factors is fresh air, which includes the exchange of oxygen and carbon dioxide known as Fresh Air Exchange (FAE). For mushrooms to carry out their metabolic functions, they require oxygen. Having a consistent supply of fresh oxygen ensures that the mycelium, the vegetative part of the fungus, stays strong and vibrant.
When mushrooms grow, they naturally produce carbon dioxide (CO2) as a by-product. However, excessive levels of CO2 can actually impede their growth, resulting in elongated stems and undersized caps. By providing proper Fresh Air Exchange (FAE), the concentration of CO2 can be reduced, allowing mushrooms to develop healthily and thrive.
Fresh Air at Home
In most homes, there is usually a decent amount of fresh air exchange (FAE) happening naturally. This happens through everyday activities like opening doors and windows, as well as the general movement of air. So, there’s no need to worry too much about ensuring enough FAE in these environments. However, when it comes to maintaining the right humidity levels, things can get a bit more challenging. It’s important to keep an eye on the humidity and make necessary adjustments to prevent the substrate from drying out. This will help create a comfortable and healthy living environment for everyone in your home. A few ways to improve the balance of FAE and moisture are:
Remove any Tents – Try removing the tent for a short period every day. This simple act can infuse the mushrooms with a much-needed breath of fresh air, supplying them with the oxygen they require to thrive.
Exhaust Fans – If you’re using grow tents, it’s highly recommended to set up an exhaust fan that pulls air outside. This way, you can maintain a consistent supply of fresh air, effectively managing CO2 levels for optimal plant growth.
Cutting Holes – One effective way to enhance the humidity and FAE levels inside a tent is by creating small openings to allow for natural airflow. This technique not only promotes better moisture retention but also helps in maintaining optimal humidity levels.
Mushroom Kits

If collecting all the materials required for growing your own mushrooms at home sounds overwhelming, we highly suggest starting your mushroom growing journey with one of our easy to use Mushroom Growing Kits. Not only do they come ready to use, but they’re a great way to dip your toes in without over spending. Check out our great selection below to get started.
White Oyster Mushroom – White oyster mushrooms possess an exquisite appearance with their fan-shaped cap and white gills. When it comes to taste, they offer a delightful combination of mild, nutty flavors reminiscent of cashews or almonds, with just a hint of seafood-like essence. Their soft and velvety texture adds to the overall sensory experience, while the delicate earthy aroma creates an inviting ambiance.
Blue Oyster Mushroom – Blue oyster mushrooms are truly unique with their blue-gray cap and delicate white gills. When it comes to taste, they offer a mild and savory flavor, with delightful hints of seafood and anise. Their soft and chewy texture gives them a meaty feel that is truly satisfying.
Black Oyster Mushroom – Black oyster mushrooms, a delightful hybrid variety, boast a captivating marbled cap and a sturdy stem. Their flavor profile is truly remarkable, blending sweetness, umami, and a hint of pepperiness for an extraordinary taste experience. With their hearty and chewy texture, these mushrooms lend themselves brilliantly to soups, stews, stir-fries, and even as meat substitutes.
Lion’s Mane Mushroom – Lion’s mane mushrooms are truly unique with their white, fluffy spines. When cooked, they offer a delightful combination of sweetness and nuttiness that resembles the flavor of seafood. What’s more, their tender yet slightly chewy texture makes them incredibly versatile in various culinary creations.
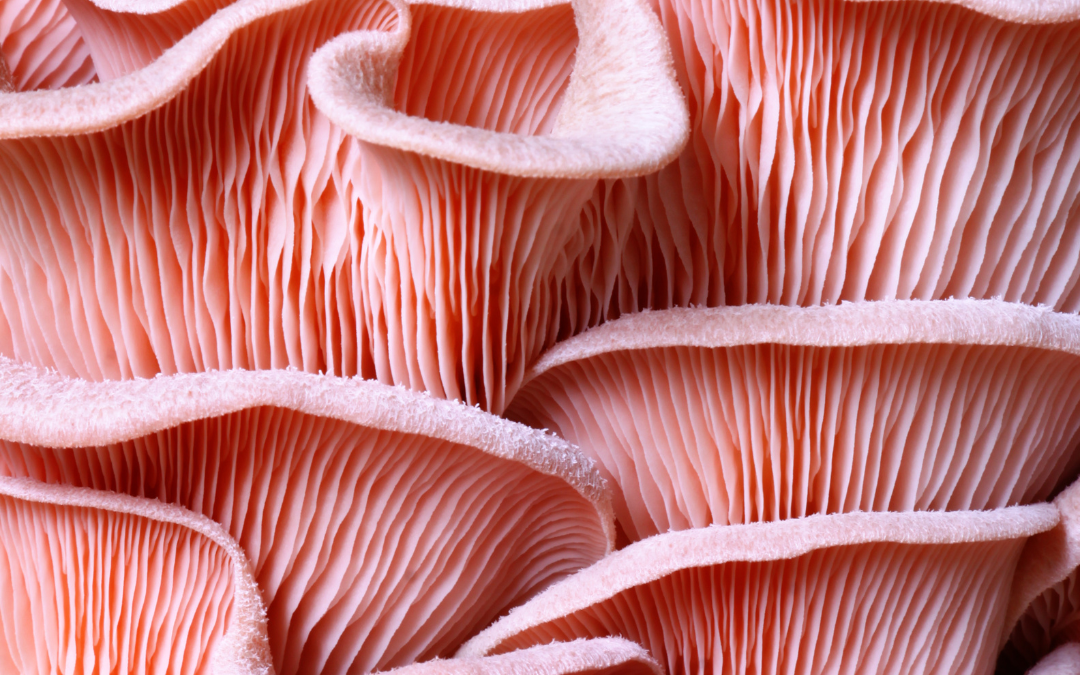
Pink Oyster Mushroom – Pink oyster mushrooms are truly delightful with their distinct pink color and unique fan-shaped cap. When cooked, they offer a delightful sweet and nutty flavor that carries a subtle hint of seafood. Not only that, but their tender and chewy texture also makes them versatile for use in a wide variety of dishes.
Remember that patience is key when it comes to growing mushrooms. It is a process that requires time and dedication but can be incredibly rewarding when you see those first tiny caps emerge from your carefully cultivated substrate.
Whether you’re interested in cultivating gourmet culinary mushrooms or exploring the world of medicinal fungi, learning how to grow mushrooms opens up endless possibilities for culinary creations or natural remedies. So roll up your sleeves and embark on this exciting journey of mushroom cultivation – who knows what delicious surprises await!
Have a suggestion or question?
Let us know at info@wildwoodoutdoorliving.com.
Sign up here for more blogs dedicated to better gardening!

by Wildwood Outdoor Living | Nov 14, 2023 | 101
While it’s time to take your garden indoors, we thought you might want to try something new and exciting this indoor growing season. Microgreen Pea Shoots! They grow quickly, ensuring that you can enjoy their wonderful benefits in no time. Learn everything this is to grow your very own Microgreen Pea Shoots below, to get growing this winter season!
About Microgreen Pea Shoots
Microgreens are delightful baby salad greens that are similar to sprouts, but they’re grown in soil. Unlike sprouts, which require quick germination to prevent rotting of the seeds, microgreens can be sown just like any other herb or vegetable seeds. This means that even those seeds with longer germination requirements can still be cultivated as microgreens. Just imagine growing basil, carrots, spinach, and other delicious edible greens! Learning how to grow Microgreen Pea Shoots are truly valuable because you can cultivate them indoors throughout the winter season for a nourishing supply of fresh vegetables.
How to Enjoy Microgreen Pea Shoots
Pea shoots are truly incredible when enjoyed in their natural raw state. You can also enhance their deliciousness by tossing them with a flavorful sesame-based dressing or adding them to stir-fries towards the end of cooking, preserving their wonderful crunchy texture. We carry the highly sought-after Dwarf Grey sugar variety, known for its exceptional quality and delectable flavor of thick, rapidly growing shoots. However, it’s worth noting that any type of pea seeds can be used to cultivate these delightful microgreen pea shoots. It’s a fantastic product to experiment with alongside kids as these greens grow surprisingly fast. Not only are they sweet and tasty, but they also pack a nutritional punch!
Growing Microgreens Indoors
Indoor gardens have their own advantages when it comes to simplicity and control. Unlike outdoor gardens, you don’t have to worry about unpredictable factors that could hinder or enhance your success. Sprouts, for example, can easily be grown by rinsing the seeds with water repeatedly. It’s a quick process that can be completed within a few days since you typically choose plants that germinate rapidly. On the other hand, microgreens are grown in soil and harvested once their first leaf or leaf pair appears. With microgreens, there is no rush as they grow steadily in their natural environment.
How to Grow Microgreens
Step 1 – Timing Microgreen Pea Shoots
Microgreen Pea Shoots typically take just two weeks to grow. It’s important to be patient and allow extra time for them to grow if needed. Additionally, keep in mind that microgreens can be grown year-round as long as they receive sufficient light.
Step 2 – Starting Microgreen Pea Shoots
To give your seeds the best chance of thriving, it’s important to follow the planting instructions for each variety. Some seeds prefer to be sown on the surface of the soil, while others need to be covered. For optimal results, we suggest using sterilized seed starting soil in shallow trays that have drainage holes at the bottom. If you’re interested in growing microgreens, you might consider using 12-cell plug inserts that can easily fit into seedling germination trays. Happy planting!
Tip: If you want to grow microgreens but don’t have traditional gardening pots, don’t worry! You can repurpose recycled plastic containers or clamshell packaging for this purpose. Just make sure to poke some drainage holes at the bottom for proper water flow. While using a seedling warmer can speed up germination, it is not absolutely essential.
When spreading the sterilized soil, it’s best to keep it at a depth of only 2-3 inches. This ensures that there will be enough space for the baby seedlings to grow their roots comfortably as you prepare for harvest time.
Step 3 – Watering Microgreen Pea Shoots
After planting the seeds, it’s important to keep the soil moist, similar to a wrung out sponge, but avoid allowing it to sit in water. You can use a mist sprayer to regularly spritz the soil and maintain the moisture level. A helpful tip is using seedling germination trays – you can place a second tray on top of the planted tray to trap moisture inside and prevent rapid evaporation.
Step 4 – Growing Microgreen Pea Shoots
Once you spot the first sprout emerging from the soil, it’s time to take action. If you have been using a seedling warmer, go ahead and remove the tray from it. Similarly, if you have been using a cover for your seeds, it’s time to remove that as well. Remember that bright light is crucial for healthy microgreen growth. During late spring to early autumn, growing microgreens outdoors under natural daylight conditions is ideal. However, when cultivating them indoors, especially during the short and dim days of winter, it becomes important to provide some form of supplemental light to ensure their proper development.
Step 5 – Harvesting Microgreen Pea Shoots
When it comes to harvesting microgreens, it’s best to wait until the first leaf pair fully opens and turns green. That’s when they are packed with the most nutrients. However, if you prefer, you can let them continue to grow and simply harvest as needed. Just keep in mind that the longer they are left to grow, the more roots will develop in the soil.
When they’re ready, you can gently remove microgreens from the soil and give them a gentle rinse until all the soil particles are washed away. You have the option to enjoy them as whole, including their roots. Alternatively, you can trim them with scissors and responsibly dispose of the used soil in your compost bin.
Getting Microgreen Pea Shoots
Now that you know just how easy it is to grow the highly nutritious Microgreen Pea Shoots, why not give them a try? Click here for our favourite Microgreen Pea Shoot seeds and be sure to keep us posted on your growing journey online through social media @wildwoodoutdoorliving.
Have a suggestion or question?
Let us know at info@wildwoodoutdoorliving.com.
Sign up here for more blogs dedicated to better gardening!
