by Wildwood Outdoor Living | Oct 3, 2023 | How To Grow
Scilla 101
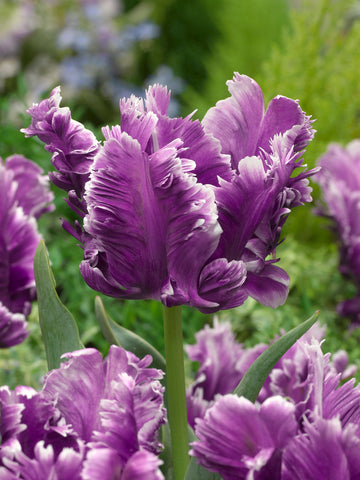
Welcome to the enchanting world of Scilla! Get ready to be captivated by the beauty of these delicate spring flowers. With their vibrant blue petals, Scilla siberica is sure to bring a burst of color and joy to any garden. These bulb plants are an absolute delight to behold, and you’re in for a treat as we explore their fascinating features further.
About Scilla

Also known as Siberian Squill. Scilla is a beautiful flowering plant that belongs to the Asparagaceae family. It is native to regions like Siberia and other parts of Europe. Scilla is known for its vibrant blue or purple flowers that bloom in early spring, adding a splash of color to gardens and landscapes. These delicate flowers are bell-shaped and grow in clusters on sturdy stems.
Naturalizing
Scilla has become a beloved choice among gardeners seeking low-maintenance plants. Its unique characteristic of spreading quickly allows it to create a captivating carpet of enchanting blooms in no time. For those looking to add beauty and charm to their gardens without the hassle, Scilla proves to be an exceptional choice for mass landscaping.
Symbolism
Scilla, with its breathtaking beauty, holds a deeper significance in various cultures. Beyond being a visual delight, this vibrant flower symbolizes rebirth and new beginnings. It blooms during the early spring season, marking the start of a fresh chapter in nature’s cycle. In many cultures, Scilla serves as a powerful reminder of the resilience and potential for growth that comes with embracing change. Its delicate petals carry messages of hope and optimism for those seeking to embark on new journeys or turn over a new leaf in their lives.
How to Grow Scilla

If you’re looking to add a burst of vibrant color to your garden, planting and propagating Scilla bulbs is a great choice. These hardy bulbs are known for their beautiful blue flowers and can thrive in various growing conditions. In this section, we will guide you through the process in 5 easy steps, ensuring successful growth and blooming.
Step 1: Soil Preparation
Preparing the soil is crucial for the healthy development of your Scilla bulbs. Choose a well-draining location with fertile soil. Fertilizing bulbs is another important aspect of their care routine. Before planting Scilla bulbs, incorporate well-balanced bulb fertilizer into the soil according to package instructions. This will provide essential nutrients for healthy growth and vibrant blooms. During the growing season, you can supplement with a slow-release fertilizer or liquid fertilizer specifically formulated for bulbs.
Step 2: Spacing
When it comes to planting Scilla bulbs, proper spacing is essential. Leave enough room between each bulb to allow for optimal growth and spread. Aim for a spacing of about 3-4 inches between each bulb, ensuring they have enough space to flourish without overcrowding.
Step 3: Depth of Planting
The depth at which you plant your Scilla bulbs plays a significant role in their overall health and blooming potential. Dig holes that are approximately 3-4 inches deep. Place the bulbs in the holes with their pointed ends facing upwards, gently covering them with soil.
Step 4: Watering Techniques
Once your Scilla bulbs are planted, it’s important to establish proper watering techniques. These plants prefer moist soil, so it’s crucial to water them regularly. However, be cautious not to overwater as it can lead to root rot. A good rule of thumb is to water deeply once a week, allowing the soil to dry slightly between waterings.
Step 5: Maintenance and Care
To ensure continued success with your Scilla bulbs, regular maintenance is necessary. Keep an eye out for any signs of pests or diseases and take appropriate measures if needed. In addition to regular watering, mulching can greatly benefit your Scilla plants. Applying a layer of organic mulch around the base of the plant helps retain moisture in the soil and suppresses weed growth. It also acts as insulation during extreme temperatures, protecting the bulbs from harsh weather conditions.
Common Problems with Scilla Plants

Maintaining a beautiful garden can sometimes be challenging, especially when it comes to dealing with pests and diseases that can harm our beloved plants. In the case of Scilla, these enchanting flowers are not exempt from facing their fair share of troubles. However, fear not! With the right knowledge and proper pest control methods, you can ensure the health and longevity of your Siberian squill garden.
When it comes to pests that commonly affect Scilla, there are a few culprits to watch out for. One such pest is the bulb mite, which feeds on the bulbs and can cause significant damage if left unchecked. Another common pest is the slug, known for its voracious appetite for tender plant leaves. Additionally, squirrels and mice may also pose a threat to your Scilla by digging up bulbs or nibbling on foliage.
Have Fun with Scilla

To enhance the beauty of these flowers even further, consider pairing them with companion plants that complement their colors and textures. For instance, daffodils or tulips can create a striking contrast when planted alongside Scilla. The combination of yellow or red blooms with the blue hues of the Scilla will create an eye-catching display that is sure to impress.
Additionally, you can experiment with different heights and layers by planting taller companion plants such as ornamental grasses or shrubs behind the low-growing Scilla. This will add depth and dimension to your garden design while providing a backdrop that allows the Scilla to truly shine.
So why not unleash your creativity and let these charming flowers inspire you? With their enchanting blue blossoms and countless companion plant possibilities, incorporating Scilla into your garden design is sure to bring joy and beauty for seasons to come.
Have a suggestion or question?
Let us know at info@wildwoodoutdoorliving.com.
Sign up here for more blogs dedicated to better gardening!
by Wildwood Outdoor Living | Oct 3, 2023 | Monthly Gardening Tips
Welcome to October 2023, where the world of gardening is blooming with endless possibilities! With a wide range of tasks such as pruning, planting, and decorating, this month has something exciting for all garden enthusiasts. We have put together a helpful list of “Fall To-Do’s” to make sure you stay productive and engaged this October, just like a busy bee. Take a look and discover some exciting activities to enjoy during this autumn season.

1.) Once the leaves have fallen, it’s time to show your pond some care. Gently remove the netting and take a moment to clean the bottom of the pond. This will help maintain a healthy and beautiful environment for your aquatic friends.
2.) The ideal time to transplant shrubs or young trees to new locations is during the month of October. This timing ensures that they have enough time to establish their roots before the harsh winter weather arrives. By moving them during this period, you can provide them with the best chance of thriving in their new environment.
3.) Now is the perfect time to explore an exceptional variety of fall bulbs. At Wildwood Outdoor Living, we take pride in offering the widest selection available, both online and in-store. We encourage you to plan ahead for your garden visit, ensuring that you create the ideal growing conditions for your chosen bulbs.
4.) In October, it’s important to show care for your perennials by cutting out any diseased areas. By doing so, you can help protect the overall health of your plants. However, it’s crucial to remember not to compost these diseased parts to prevent further spreading of the disease.

5.) To ensure a healthy lawn in the spring, it’s important to lower the blade on your lawn mower and trim the grass shorter during the fall season. This simple step can help prevent issues like snow mold, a type of fungus, from forming when the weather warms up again. By taking care of your lawn now, you’re setting it up for success in the future!
6.) It’s important to continue watering your trees and shrubs until the ground freezes. This extra care will ensure that they stay nourished and healthy throughout the winter months.
7.) During this time, it would be a great idea to begin taking cuttings of fuchsias and geraniums. By doing so, you can assist your beloved plants in entering a dormant state throughout winter. This will allow them to conserve their precious energy for the upcoming spring season. It’s a gentle way to show your care and ensure their well-being.
8.) To create a safer environment around your home, it’s helpful to trim tall grass near trees and corners. This simple action can discourage small rodents from building nests and potentially causing damage.

9.) In heavy clay areas, it would be beneficial to incorporate gypsum lime and organic compost into the soil. This can help transform the clay into a more workable and fertile soil, allowing for better growth of plants and improved drainage. By making this simple adjustment, you can create conditions that promote healthy plant growth while also caring for the environment through organic methods.
10.) When it’s time to prepare your tender bulbs like dahlia, canna, and gladiola for storage, gently unearth them from the ground. It’s important to handle them with care. Once they have been dug up, carefully wrap them in a damp material to maintain their moisture levels during storage. Find a cool and dark space where you can store these bulbs until they are ready to be replanted again.
11.) To achieve a beautiful and healthy lawn during the fall and winter seasons, it’s recommended to use a lawn fertilizer with a ratio of 6-10-20. For optimal results, make sure to apply the fertilizer earlier in the month, specifically between October 1st and 15th. This will give your lawn ample time to absorb the nutrients and prepare for colder weather.
12.) Discover the delight of gardening right in your own home! Embrace the beauty and tranquility by beginning an herb garden or tending to new houseplants. It’s a wonderful way to bring nature inside and nurture your green thumb.
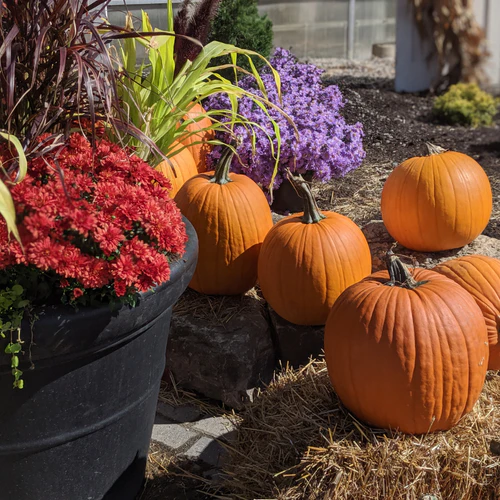
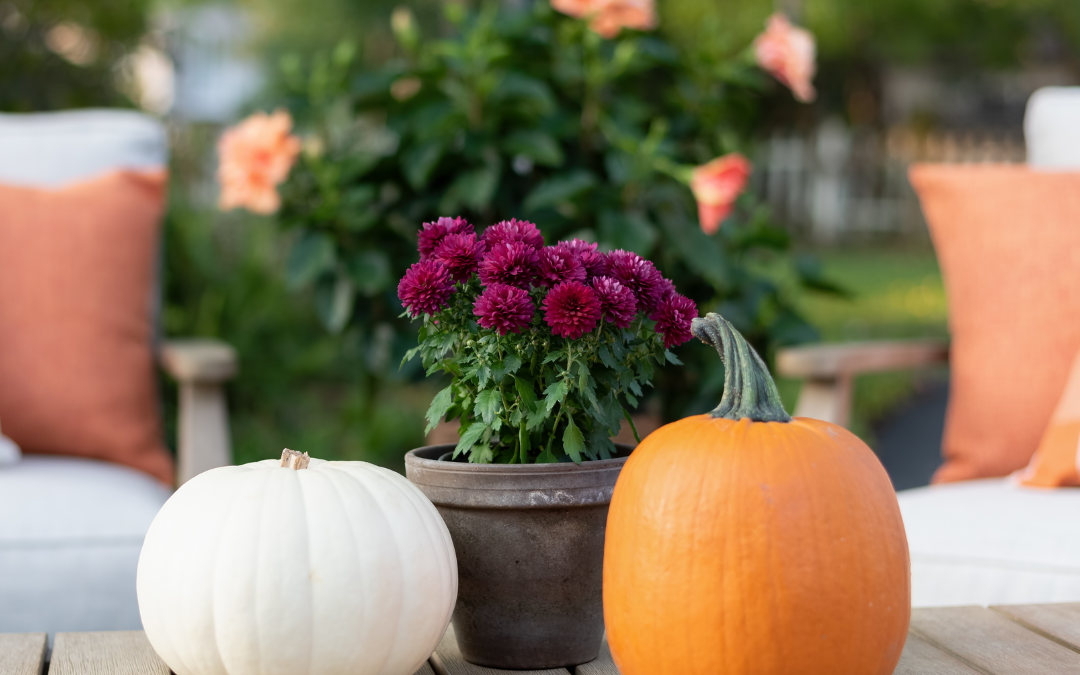
13.) The autumn season is filled with magical beauty, especially in October. It’s the perfect time to embrace the stunning fall decor! With all the things you’ve cultivated this year, why not consider creating something truly special? You could design a beautiful fall wreath, preserve lovely pressed flowers or even decorate pumpkins to add a touch of charm to your surroundings. The possibilities are endless and I’m sure whatever you create will be absolutely delightful!
No matter what sparks your interest, fall is a wonderful time to indulge in the joys of gardening. There are numerous tasks waiting for you that will keep you happily occupied! We wish you all the best of luck this planting season and look forward to growing with you!
Have a suggestion or question?
Let us know at info@wildwoodoutdoorliving.com.
Sign up here for more blogs dedicated to better gardening!
by Wildwood Outdoor Living | Sep 18, 2023 | How To Grow
How To Plant Fall Bulbs
Planting flower bulbs in the fall is a common topic of conversation, but understanding the reasons behind it, what types of bulbs to use, when to plant them, and how to do it can be quite intricate. Don’t worry – we’re here to support you. Below is a comprehensive guide that covers everything you need to know about planting flower bulbs during the autumn season.

Narcissus, Ice Follies
Cool Temperatures
To ensure the optimal growth of spring-blooming bulbs, including garlic, it is crucial to expose them to longer periods of cold temperatures. This helps create the perfect conditions for their development and ensures a beautiful display in the springtime, this process is referred to as Vernalisation.
The vernalisation process is truly amazing as it jumpstarts a plant’s growth by reducing its vegetative stage. This not only results in bigger and more abundant flowers, but also extends their lifespan. Furthermore, it strengthens the overall health of the plant, making it more resilient to both cold temperatures and fungal diseases.
In warmer regions, people need to refrigerate their spring-blooming bulbs to ensure proper growth. However, here in Canada, we are fortunate enough to simply plant them in the ground and let nature take care of the rest for us. It’s a convenient and natural way to enjoy the beauty of these bulbs without any extra effort.

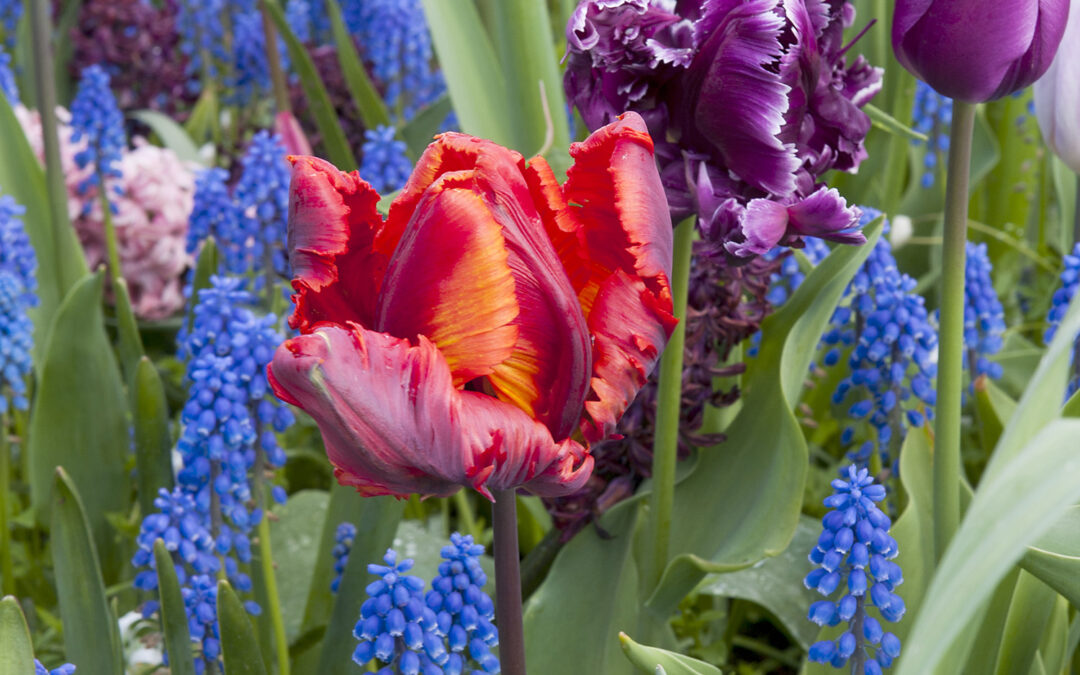
Tulip, Dolls Minuet
When To Plant Fall Bulbs in Canada
Planting fall bulbs can sometimes be overwhelming with all the different opinions and urban legends about the best time to do it. However, it doesn’t have to be a complicated and mythical process. If you prefer, you can track soil temperatures and wait until they consistently stay below 15ºC before planting. But don’t worry too much about being extremely precise – nature is resilient, and your bulbs will likely thrive regardless of the exact moment you choose to plant them.
A helpful tip for planting bulbs is to keep track of the weather. Once the temperatures start to drop and frost is a few weeks away, it’s a good time to begin. Aim to plant your bulbs during the week when frost is predicted. This way, you can ensure they have a successful start in their new home. By planting your bulbs just before the first frost, you’re giving them a chance to establish their root system before winter arrives. This helps them survive and flourish when spring comes around.
If October begins with unexpectedly warm weather, it would be ideal to wait for a week before planting. However, if waiting is not possible, there’s no need to fret. You can go ahead and plant them whenever you’re able to, whether it’s earlier or later. Just make sure to keep an eye out for any signs of green sprouting after you’ve planted them.
TIP: If you notice tiny leaves starting to emerge, it’s important to provide them with a protective layer of mulch. This will help keep them cozy and safe during the winter months.
Preparing Your Soil For Fall Bulbs
When it comes to preparing soil for bulb planting, there are a few helpful tips to keep in mind. First and foremost, choose an ideal location for your fall bulbs. Find an area that receives ample sunlight and has well-drained soil. Remove any weeds or debris from the planting site to give your bulbs a clean start. Next, loosen the soil using a garden fork or tiller, ensuring that it is not compacted which can hinder proper growth. Consider adding organic matter such as compost or peat moss to enrich the soil and provide necessary nutrients for your bulbs. By following these guidelines, you’ll create a compassionate environment that promotes healthy bulb growth and beautiful blooms in the future.

Tulip, Black Hero
How To Plant Fall Flowering Bulbs
To plant spring flowering bulbs in the fall, there’s no need to feel overwhelmed. In fact, it’s a straightforward process that can be easily followed by anyone with a green thumb or even those just starting out in gardening. To ensure successful blooming come springtime, there are three general guidelines that you should keep in mind. By following these simple steps, you’ll be well on your way to creating a vibrant and colorful garden for everyone to enjoy.
- When planting bulbs, it’s important to remember the recommended guidelines for depth and spacing. Plant them three times deeper than their height, allowing them to establish strong roots. Additionally, space them two times wider apart than their height to give each bulb enough room to grow. For example, if your bulb is 2 inches tall, plant it 6 inches deep and ensure a spacing of 4 inches between each bulb. This will provide the ideal conditions for healthy growth and thriving plants in your garden.
- When planting bulbs, it is important to remember that the pointy side should face upwards. This is because the leaves will emerge from this point, while the round bulb end is where the roots will develop. Taking care to plant them correctly will help ensure healthy growth for your plants.
- To ensure the bulbs have a good start, it’s important to give them a generous amount of water. Since they are planted at a deeper level, it’s best to provide them with a long, gentle watering after planting. This will allow the water to penetrate deep into the soil, encouraging strong root growth.

Protecting Your Fall Bulbs
During the winter season, it’s essential to take care of your fall bulbs and protect them from frost and freezing temperatures. By implementing some simple measures, you can ensure their survival and encourage their growth when spring arrives.
As winter approaches and the temperature drops, it’s important to remember that our fall bulbs need some extra care and protection. These little wonders of nature hold the potential for beautiful blooms in the spring, but they are vulnerable to frost and freezing temperatures. By taking a few simple measures, we can ensure their survival and give them the best chance to thrive when spring arrives.
1.) One of the first steps is to provide a layer of insulation around your bulbs. This can be done by adding a thick layer of mulch or straw on top of the soil where your bulbs are planted. This protective layer will help regulate temperature fluctuations and shield them from harsh weather conditions.
2.) Another important aspect is proper watering. While it may be tempting to water less during the winter months, it’s crucial to keep your bulbs adequately hydrated. Before the ground freezes, make sure they receive enough moisture so that they don’t dry out. However, be cautious not to overwater as this can lead to rotting.
3.) In addition to insulation and watering, consider providing some shelter for your fall bulbs. If you have potted bulbs or those planted in exposed areas, you might want to move them closer to a wall or under an overhang that offers some protection from strong winds and extreme cold.
4.) Lastly, don’t forget about pests! While many critters go into hibernation during winter, there are still rodents who might see your dormant bulbs as a tasty treat. To deter these unwanted visitors, place wire mesh or fencing around your bulb beds.
Remember that with proper care and attention, our fall bulbs will reward us with vibrant blossoms when spring finally arrives. By implementing these simple measures – insulating with mulch or straw, providing adequate water without overwatering, offering shelter from harsh elements and protecting against pests – we can ensure their survival and encourage their growth throughout the colder months.
Let’s take this opportunity to show our love for these resilient plants by taking the necessary steps to protect them during winter. They are an integral part of our gardens, bringing joy and beauty to our lives when we need it most.
Sit Back and Wait
Planting fall bulbs in your spring garden can yield truly satisfying results. The vibrant blooms that emerge are a testament to the beauty and resilience of nature. It’s a wonderful feeling to see your garden transform into a colorful paradise, with each bulb contributing its unique charm. The anticipation and patience required for this process make the eventual growth even more rewarding. So go ahead and enjoy the fruits of your labor, knowing that you’ve created something truly special in your own backyard. And check out our 2023 collection of Fall Bulbs to choose your favourite blooms.
Have a suggestion or question?
Sign up here for more blogs dedicated to better gardening!
by Wildwood Outdoor Living | Sep 11, 2023 | Top 5 in The Garden
As trees and shrubs begin to display their beautiful autumn colors and fall-blooming perennials start to blossom, why not enhance the vibrancy of your garden by planting some cold-tolerant annuals? These resilient plants will bring even more color and life to your outdoor space during the cooler months. These lovely plants are ideal for replacing tired ones in your summer container gardens, adding a splash of seasonal interest to beds and borders, or giving your front door, patio, or deck a fresh and vibrant appearance for the fall season.
1. Strawflower

Strawflower is truly a delightful addition to any garden. Not only does it bring vibrant colours, but its unique texture adds a touch of beauty as well. The petals, with their stiff and paper-like feel, make this flower particularly perfect for dried floral crafts.Strawflowers can be found in a beautiful variety of hues like yellow, orange, red, pink, and white.
To ensure your strawflowers stay vibrant and blooming for a long time, it’s important to protect them from freezing temperatures. These delicate flowers are not tolerant of frost, so taking precautions against the cold will help them thrive and provide continuous beauty in your garden. To ensure their healthy growth, it’s best to plant them in a spot blessed with plenty of sunshine and well-drained soil.
2. Flowering Kale

Flowering kale, while it belongs to the same family as the kale you’d typically eat, is primarily grown for its beauty rather than its edibility. Its leaves are thick and tough, making them less desirable for consumption. Interestingly, despite its name, flowering kale doesn’t actually produce flowers. However, the inner leaves often showcase stunning shades of white, pink, or purple.
You can create a beautiful seasonal display by combining mixed pansies with it. Even in freezing temperatures, this pairing will stand strong. For the best coloring, make sure to plant them in an area that receives full sun.
3. Calibrachoa

Calibrachoa is a cherished annual flower that brings joy with its vibrant hues and requires minimal upkeep. Although it is typically seen as a summer plant, calibrachoa exhibits resilience in colder temperatures as well. One of the wonderful things about fall annual container gardens is how they can effortlessly bring beauty to any space. A perfect example is when this gorgeous plant cascades from a hanging basket, creating a stunning visual. With its jewel-tone flowers available in an array of colors, it effortlessly complements and enhances any design theme you can dream up.
When you’re ready to plant, try to find a sunny area with soil that drains well. This will give your plants the best chance to thrive and flourish.
4. Pansy

These delightful and cold-resistant plants bring joy with their vibrant flowers that come in a variety of colours. You can enjoy the cheery blooms in shades of red, orange, yellow, white, purple, and blue. Pansies are commonly grown as annuals, especially in container gardens. However, it’s important to know that they are actually short-lived perennials. They can withstand colder temperatures and thrive in zones 6-11.
5. Ornamental Peppers

These resilient annual plants are sure to add a dash of excitement to your garden! Ornamental Peppers not only produce vibrant fruits in a range of striking colors like red, orange, yellow, blue, purple, and even black but they are also quite easy to cultivate. While some varieties do pack a spicy punch, there are others that have non-pungent fruits and can be safely grown around small children.
Not only do these varieties showcase their delicious fruits, but they also boast stunning variegated foliage. To ensure optimal growth, make sure to plant them in a sunny area with well-draining soil. However, it’s important to note that like strawflowers, these fall annuals are not very frost tolerant. So, when the colder weather arrives, remember to cover or protect them for their wellbeing.
Have a suggestion or question?
Let us know at info@wildwoodoutdoorliving.com.
Sign up here for more blogs dedicated to better gardening!
by Wildwood Outdoor Living | Sep 6, 2023 | news
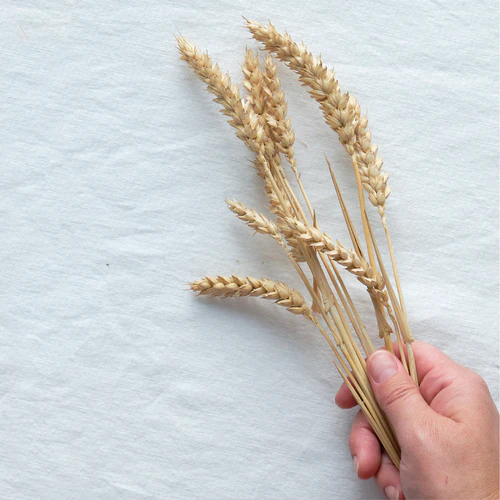
Fall rye, scientifically known as Secale cereale, is a remarkable cereal grain that serves as an exceptional soil builder. Its unique characteristics make it a valuable asset for agricultural practices in various climates. Notably, fall rye exhibits rapid growth during the autumn season and has the ability to withstand harsh winter weather conditions even in zone 3.
Fall Rye Growth
One of the key advantages of fall rye is its vigorous growth in the spring. However, it is important to manage its height before it reaches 30cm (12″) to ensure easy incorporation into the soil. As it grows taller and reaches 1m (3′), turning under or cutting back becomes more challenging.
Fall Rye Soil Benefits
Furthermore, fall rye boasts extensive root systems that contribute to its soil-building capabilities. These roots penetrate deep into the ground and help improve soil structure by enhancing water retention and nutrient availability for other crops.
In conclusion, fall rye proves to be an invaluable addition to any agricultural system due to its ability to build healthy soils. Its resilience against winter weather combined with rapid spring growth makes it a versatile choice for farmers seeking sustainable solutions for their fields.
FALL RYE USES

Fall Rye Recipes
In the culinary world, fall rye shines as an ingredient with its nutty flavor and hearty texture. It can be ground into flour to make breads and pastries or cooked whole as a side dish or salad ingredient. Fall rye’s versatility extends to soups, stews, and even desserts like puddings or porridges.
Fall Rye Décor
When it comes to home décor, fall rye can be used in various ways to add warmth and texture. Its dried stalks can be arranged in vases or woven into wreaths for a charming autumnal display. Additionally, fall rye can be incorporated into table centerpieces or used as filler in decorative baskets for a natural and earthy feel.
Fall Rye Nutrients
Beyond its culinary uses and decorative appeal, fall rye also offers numerous nutritional benefits. Packed with fiber, vitamins B and E, magnesium, and iron, incorporating fall rye into your diet can support digestion, heart health, and overall well-being.
HOW TO GROW FALL RYE

Timing
To achieve the best results, it is recommended to plant fall rye approximately 6-8 weeks before the first frost date. This timing allows the seeds to germinate and establish themselves before winter sets in. In some cases, rye seeds can even germinate as late as early November.
Tip: Alternatively, a spring crop of rye can be planted during the months of March through April. This provides ample time for growth and development before the onset of summer.
Zone
Rye is known for its resilience and ability to withstand harsh climates. It is classified as hardy to Zone 3, which means it can tolerate temperatures as low as -40°C (-40°F).
Caring for Fall Rye
In addition to proper watering, providing regular care and attention throughout each stage of growth is essential for maximizing yield potential. Regularly monitor for pests or diseases that may pose a threat to your crop’s health and promptly address any issues that arise.
With patience and dedication, you can look forward to reaping the rewards of your laborious efforts as you enjoy a bountiful harvest of this nutritious grain. Whether you plan to use rye in baking, brewing or as a cover crop to enrich your soil, the possibilities are endless.
Have a suggestion or question?
Sign up here for more blogs dedicated to better gardening!