Care Tips & Simplified Pruning
Many people assume that vines of the same name behave the same way. Clematis, jasmine, honeysuckle, passion flowers. These are the categories that separate and define vines.
But what if I told you that wasn’t exactly true? Yes, these vines are all very different and need to be treated differently, however, even within their named groups, vines have special needs that should be attended to.
This might sound like a lot of information to go over for today, so let’s just cover the first one: Clematis.
General Care Tips
So where do we begin? Well, let’s learn a little bit about their needs.
Plan Where you Plant
- Clematis can live for a very long time, and they are not fans of being moved around.
- They like to have cool roots while also being in full sun. Having other plants around to shade the roots is preferable. If that isn’t an option, you can also use mulch to provide some relief from the heat.
Know Your Soil
- Soft, loamy, well-drained soil is best for your new vine friend.
- They aren’t huge fans of acidic soil and prefer to be on the alkaline side of the PH scale (so probably don’t plant it near a rhododendron or azalea).
Learn How They Climb
- Clematis use leaf stems to vine. They look very similar to pea vines in that they will coil themselves around anything that is close to them (in the nursery we find they like holding onto each other).
- These vines are fairly small and need something about ¼ inch in diameter to coil around.
Give it Support
- Clematis vines are more fragile than they seem. If the vine isn’t given enough support it will begin to flop over and will likely crack. This will result in the new trailing growth to die back.
- To prevent this, make sure the clematis has something to hold onto.
- A trellis, some chicken wire, or even other plants are all perfectly fine for a clematis to use as growth support.
Pruning: The Basics
So, what are the 3 pruning groups?
Group 1:
The clematis in group 1 grow their buds on old growth. Because of this, they don’t die back in the winter and should be pruned sparingly.
They are usually the first to bloom with flowers appearing in spring. After the flowers are gone you can then prune back the vine. You only need to remove any dead wood and make sure the vine is staying neat and tidy.
Since the buds form on old growth, if you over prune you will likely see fewer flowers the following spring.
Examples:

Group 2:
These clematis are popular due to their ability to bloom twice in a year. Like group 1, they need minimal pruning. Before they start to leaf out in spring, prune back last year’s new growth. Gently thin out the vine while detangling stems. Make sure to keep the old growth as that is where you will see the first set of blooms.
After spring, once the first set of flowers have died off, you can trim back those branches to encourage new growth. The second set of flowers appear in the late summer and appear on new growth. This is when you would do any shape pruning. The new growth that appears after this becomes the old growth for next year that will produce the spring blooms.
Examples:

Group 3:
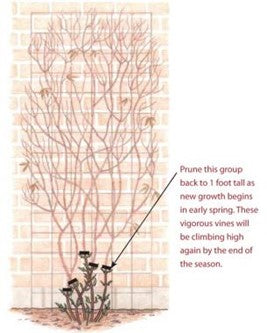
Lastly, we have the third group of clematis. These are the plants that bloom in late summer and early fall. In early spring the vine should be pruned back to around a foot tall. This will then encourage new growth that will flourish throughout the spring and summer and produce beautiful buds later in the season.
Since these clematis are cut back, they are often the ones that can survive in colder zones.
Examples:

Clematis are beautiful vines that can add to any gardens back drop. They can climb up gazebos and fences. Turn a plain structure into a wonderful display of gardening prowess.
However, understanding the type of clematis you get matters. We don’t just mean the colour. Clematis are separated into three distinct pruning groups. Each group has to be treated differently if you want to see the beautiful flowers that these vines are known for.
Now that you are equipped with this knowledge of the beautiful vines known as clematis, you are ready to grow your own! You can find our selection of clematis on our website here or browse our hundreds of products at wildwood.express.


