by Wildwood Outdoor Living | Aug 11, 2021 | Gardening 101
Fall Bulbs
While tulips and narcissus (daffodils) are some of the most known fall bulbs, there are quite a few different types of flowers that can be planted in the fall to allow for early spring blooms.
These include:
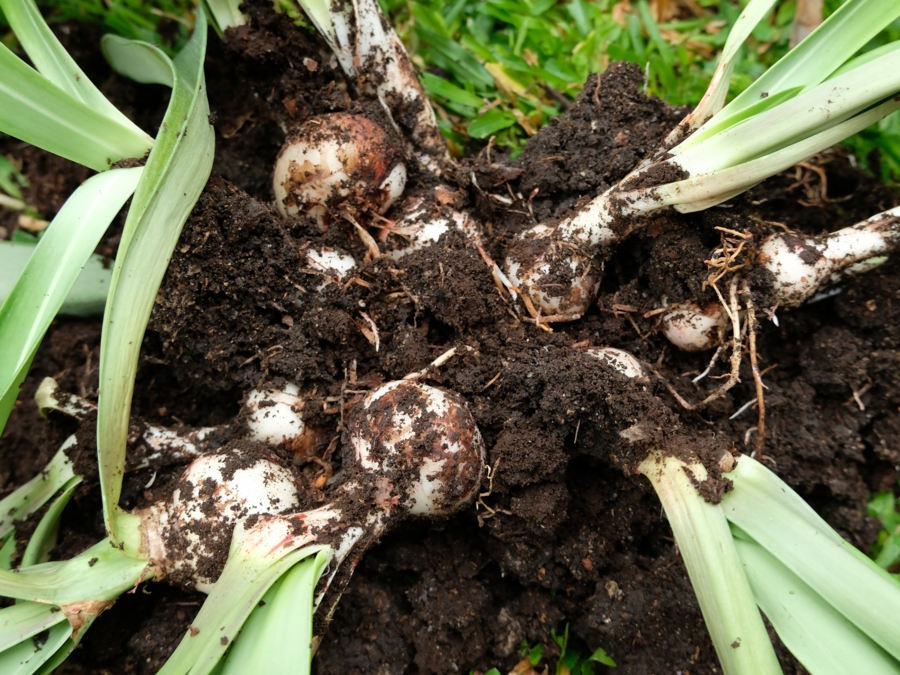
- Alliums
- Anemones
- Crocus
- Hyacinth
- Iris
- Ranunculus
- And even Garlic!
Some types, such as anemones and ranunculus, can also be planted in spring so you may have already seen some for sale earlier this year. Fall bulbs require a cooling period. This varies by type, but it can last up to 16 weeks. This forces the bulbs to remain dormant otherwise new growth could be damaged by the cold weather.
Forcing Bulbs
Wouldn’t it be nice to enjoy those fall bulbs a little sooner? Amaryllis and Paper White Narcissus are flowers that are commonly referred to as “forcing bulbs”. They are both from warm climates, so they don’t require a cooling period to trigger blooms.
So, what does that mean?
Forcing bulbs are bulbs that have been tricked into blooming out of season. The term “forcing” can make it sound like a laborious process, but its usually about as hard as planting any other kind of bulb.
How To Force Amaryllis
Amaryllis are one of the easiest bulbs to force to bloom out of season. Since they don’t need to be chilled, they can just be potted indoors and require minimal care. There are a few different options for planting amaryllis. You can pot them up, place them in a decorative vase, or order ones that come coated in wax. The choice depends on how you want your display to look, and how much time you want to put into caring for the bulbs.
Soil
If you enjoy the classic look of having your flowers potted up, then we have good news for you, you can just plant your amaryllis bulbs in some soil. There are a few things to be aware of, so here is how you should go about it:
- Choose a pot with good drainage, and make sure to use well-draining soil.
- Plant the bulb close to the top of the soil. Only cover the bottom half of it.
- Give the bulb a good soak. Let water flow out of the drainage holes.
- Move the bulb to a sunny and warm location inside your home.
- Water sparingly. Keep the soil moist but do not soak it. Once growth starts to appear (green shoots will start to come out of the bulb) you can begin watering it regularly.
- Turn the pot every few days as it grows so your Amaryllis grows straight up instead of leaning towards the sun.
- Once blooms start to appear, move the flower out of direct sunlight to prolong the lifespan of the flowers. Amaryllis take an average of 6 weeks to bloom after potting.
Water
If you prefer a more decorative look, then planting amaryllis directly into a vase might be for you. This method doesn’t require any soil and gives you a lot of options for how you would like your flower display to look.
So how do you get a flower to grow without any soil? There are a few steps:
- Choose a vase or container that you want to grow the bulb in. There are vases specifically designed for amaryllis if you don’t have any that would fit the bulb.
- Fill the bottom 2-4 inches with marbles or pebbles. Glass stones work well. Set your bulb on top of the glass or pebbles.
- Slowly pour water into the vase. Stop when the water is just below the bulb and is barely touching the roots.
- Place the vase in a sunny and warm location and soon you will see the roots growing out the of bulb and down into the pebbles. This will give the plant stability while also allowing it to take in more water.
- Make sure to rotate the vase every few days as it grows so your flowers grow straight.
- Top up the water any time it is needed, making sure to keep the water just below the bulb.
- Once blooms start to appear, move the flower out of direct sunlight to prolong the lifespan of the flowers. Amaryllis take an average of 6 weeks to bloom.
Waxed Bulbs
Finally, there is the easiest way to grow amaryllis: Waxed bulbs. Waxed amaryllis bulbs don’t require soil or water because they come with all the nutrients they need sealed inside the wax.
They usually come dipped in red, gold, silver, or copper colored wax so they fit into almost any display. You can see our wax coated Amaryllis bulbs here. Waxed bulbs are often a surprise regarding what color they will be when they bloom, but ours will bloom red.
If potting bulbs or having to remember to top up the water in the vase doesn’t appeal to you, then waxed bulbs might be just what you’re looking for. Makes sure to rotate waxed bubs every few days to keep the flowers growing straight.
With so many options (both for growing styles and bloom colors) it’s hard to say no to adding Amaryllis to your fall bulb wish list. Check out our selection of Amaryllis here or our entire selection of fall bulbs here!
Have a suggestion or question?
Sign up
here for more blogs dedicated to better gardening!

by Wildwood Outdoor Living | Jul 29, 2021 | Gardening 101
If you’re anything like us, you love your houseplants and your pets! Unfortunately, there are a lot of houseplants that can be toxic to our pets, and we don’t always know that when purchasing our newest indoor plant addition. The wrong indoor houseplant choice could lead to your pet vomiting, having diarrhea or even going into shock. This could understandably make purchasing your next indoor houseplant a little scary or maybe intimidating.
Don’t worry, all is good in the plant and pet world if you know what to look for when shopping for you next houseplant. In this article, we are going to share with you some of the most beautiful indoor houseplants that are perfectly safe for you to buy for your Benjii, Fluffy, Kona, Betty…Whoever they may be!
Calathea
These beautiful plants come in many different varieties. Pictured below are a Rattlesnake Calathea and a Medallion Calathea. Both have beautiful leaves which are red on the bottom. Calathea thrive in indirect sunlight, and while they do still like bright locations, they can still survive in low light. The require less frequent watering and can be planted in a standard potting mix soil.
Medallion Calathea Rattlesnake Calathea
Kangaroo Paw Fern
These ferns are super resilient and adaptable plants. With the little kangaroo paws poking out from the base of the plant, it can add greenery to your home while still being its own unique self.
Kangaroo ferns like consistent moisture, but make sure the soil isn’t soggy. Like a lot of ferns, they thrive in moderate to bright indirect sunlight. They also like high to moderate humidity, so they make for an excellent bathroom plant!
The toxicity of these plants is not well documented, however everything so far points towards it being safe for dogs and cats. If your dog munches on the leaves it will likely throw them up, similar to them throwing up grass, but it has not been shown to cause any lasting discomfort.

Kangaroo Paw Fern
Hawarthia
If you like succulents, then this is the plant for you. Haworthia like both indirect, and direct sunlight. It you have it in direct sunlight expect to water it once every 2-3 weeks. They are very similar to aloe vera in terms of caring for them. They stay very small, usually not exceedingly more than 6 inches in height or width. Thanks to this, they can fit into almost any home. Because, let’s be honest, plant lovers can always find room for one more succulent.
Hawarthia
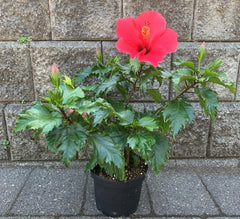
Hibiscus
Hibiscus require a bit more attention than some of the other plants on this list. To see lots of their beautiful blooms they require about 6 hours of sunlight per day. They also need a lot of water when they are in their blooming stage as the process takes a lot of energy on the plants part. All that energy is put to good use, however, due to how pretty the flowers are. In addition to lots of light and water, hibiscus like to have their roots tightly packed together in containers. If you repot them make sure to not buy a pot much bigger than the one it is currently in, but make sure it still has good drainage.
Hibiscus
Money Tree
Considered good luck in many cultures, these trees are thought to bring prosperity. You will often see them being sold around the Lunar New Year. Their braided trunk and distinct 5 leaf pattern make them easily recognizable and a favorite for many people. Money trees like bright, indirect sunlight. However, it can also adapt to low light and fluorescent lights so it can be a great addition to an office or back corner of a room. They prefer to be watered less often, but like a lot of water. Let the top 3-4 inches of soil dry out between watering’s. Lastly, make sure you turn your money tree every time you water it to allow for even growth!

Money Tree
Ponytail Palm
Looking like a cute, compact tree, these plants make for a great statement piece. It is part of the Agave family and is technically classified as a succulent! Because of this, it is very easy to take care of. Ponytail Palms are very forgiving when it comes to light. The prefer bright, indirect sunlight but can handle being in lower light conditions half the time. If you keep it in a bright, sunny location during the summer months, it will be fine in almost any light conditions during the winter months. Due to it being a succulent, it likes to dry out between watering’s. Water until water flows out of the drainage holes, then discard any accumulated water.

Ponytail Palm
Fishbone Cactus
This cactus is closer to a succulent than what you would usually imagine when you hear the word cactus. It has soft, almost rubbery leaves and no thorns or spikes. However, like a cactus, it is very hard to kill and is perfect for gardeners of all levels. Like many of the plants on our list, it enjoys bright, indirect sunlight. However, as a jungle cactus, it evolved in low light conditions so it can survive in a wide variety of light conditions. Being a cactus, it like to dry out completely between watering’s.


Fishbone Cactus
If we didn’t inspire you with these indoor houseplants, be sure to check out our full online inventory for more ideas. Next time you’re in-store, be sure to keep an eye out for our pet friendly signs to make sure it’s safe for you pet. You can even bring them in with you to help you choose the best indoor houseplant that is safe for everyone.

Have a suggestion or question?
Sign up
here for more blogs dedicated to better gardening!
by Wildwood Outdoor Living | Jul 28, 2021 | Gardening 101
Care Tips & Simplified Pruning
Many people assume that vines of the same name behave the same way. Clematis, jasmine, honeysuckle, passion flowers. These are the categories that separate and define vines.
But what if I told you that wasn’t exactly true? Yes, these vines are all very different and need to be treated differently, however, even within their named groups, vines have special needs that should be attended to.
This might sound like a lot of information to go over for today, so let’s just cover the first one: Clematis.
General Care Tips
So where do we begin? Well, let’s learn a little bit about their needs.
Plan Where you Plant
- Clematis can live for a very long time, and they are not fans of being moved around.
- They like to have cool roots while also being in full sun. Having other plants around to shade the roots is preferable. If that isn’t an option, you can also use mulch to provide some relief from the heat.
Know Your Soil
- Soft, loamy, well-drained soil is best for your new vine friend.
- They aren’t huge fans of acidic soil and prefer to be on the alkaline side of the PH scale (so probably don’t plant it near a rhododendron or azalea).
Learn How They Climb
- Clematis use leaf stems to vine. They look very similar to pea vines in that they will coil themselves around anything that is close to them (in the nursery we find they like holding onto each other).
- These vines are fairly small and need something about ¼ inch in diameter to coil around.
Give it Support
- Clematis vines are more fragile than they seem. If the vine isn’t given enough support it will begin to flop over and will likely crack. This will result in the new trailing growth to die back.
- To prevent this, make sure the clematis has something to hold onto.
- A trellis, some chicken wire, or even other plants are all perfectly fine for a clematis to use as growth support.
Pruning: The Basics
So, what are the 3 pruning groups?
Group 1:
The clematis in group 1 grow their buds on old growth. Because of this, they don’t die back in the winter and should be pruned sparingly.
They are usually the first to bloom with flowers appearing in spring. After the flowers are gone you can then prune back the vine. You only need to remove any dead wood and make sure the vine is staying neat and tidy.
Since the buds form on old growth, if you over prune you will likely see fewer flowers the following spring.
Examples:

Source
Group 2:
These clematis are popular due to their ability to bloom twice in a year. Like group 1, they need minimal pruning. Before they start to leaf out in spring, prune back last year’s new growth. Gently thin out the vine while detangling stems. Make sure to keep the old growth as that is where you will see the first set of blooms.
After spring, once the first set of flowers have died off, you can trim back those branches to encourage new growth. The second set of flowers appear in the late summer and appear on new growth. This is when you would do any shape pruning. The new growth that appears after this becomes the old growth for next year that will produce the spring blooms.
Examples:

Source
Group 3:
Lastly, we have the third group of clematis. These are the plants that bloom in late summer and early fall. In early spring the vine should be pruned back to around a foot tall. This will then encourage new growth that will flourish throughout the spring and summer and produce beautiful buds later in the season.
Since these clematis are cut back, they are often the ones that can survive in colder zones.
Examples:

Source
Clematis are beautiful vines that can add to any gardens back drop. They can climb up gazebos and fences. Turn a plain structure into a wonderful display of gardening prowess.
However, understanding the type of clematis you get matters. We don’t just mean the colour. Clematis are separated into three distinct pruning groups. Each group has to be treated differently if you want to see the beautiful flowers that these vines are known for.
Now that you are equipped with this knowledge of the beautiful vines known as clematis, you are ready to grow your own! You can find our selection of clematis on our website here or browse our hundreds of products at wildwood.express.
Have a suggestion or question?
Sign up
here for more blogs dedicated to better gardening!

by Wildwood Outdoor Living | Jul 28, 2021 | Gardening 101, tips
Bone Meal is one of those things that most gardeners have heard of but not many of us have really put any thought into. Bone Meal can sound like an aggressive name which makes it seem situational. However, it’s actually one of the most versatile fertilizers. It can be used on almost any plant and in almost any soil.
What is Bone Meal?
Bone Meal is exactly what it sounds like! It’s cooked or steamed animal bones that are then ground into a powder. Many types of animal bones are used, however beef bones are most common. These bone products are organic and a great source of the nutrients that our plants need to grow and flourish.
Bone Meal can provide a lot of benefits, such as:
- Greater fruit production and yield.
- Produces bigger and healthier blooms.
- Helps newly developing plants create stronger root structures.
- Helps protect plants from disease and pests.
Phosphorus
Phosphorus is one the major nutrients required by plants. It is a major part of photosynthesis and is largely used in crop production. It is needed in large quantities to produce fruits and vegetables. In animals, it enables the growth of strong bones. When it’s released back into the soil it helps create strong roots. So how does phosphorus enter the plant? The main way is that it is absorbed through the roots. The little hairs on a plants roots help pull the nutrients into the actual plant.

Source
Calcium and Nitrogen
I’m sure you can imagine that a fertilizer made from bones would provide calcium. Calcium promotes new growth for both roots and stems. It can also work to give you better tomato, pepper, zucchini, and eggplant yields by preventing diseases such as Blossom End Rot. The nitrogen in bone meal is usually quite low, however, it works to help round out the soil and give your plants that small but needed nutritional boost.
How to Use it
Bone meal is a favorite for many gardeners due to its slow absorption rate and the fact that it doesn’t burn the roots if you add too much.
Check the instructions on the package regarding how much you should add, but it is a good rule of thumb to use 1 tablespoon for every 2 square feet of soil.
After digging holes, add the bone meal to the bottom of the hole and mix it well. Lightly water the mixed soil so the bone meal can begin to break down.
Bone meal is great to use with bulbs, especially fall bulbs as they will need extra nutrients to help them grow after their cooling period and establish strong roots.
Things to Watch out for
Bone meal doesn’t have many downsides, but there are a few things that you want to be aware of:
- It is a slow-release fertilizer. It is preventative and planned, so it won’t show any immediate results.
- It needs to be mixed into the soil well. Since it is made of bones, it smells like food to a lot of animals. If you want to avoid scavengers digging in your garden make sure it’s mixed in well.
- It is mostly effective in soils with a PH below 7. Plants in Alkaline soil tend to absorb fewer nutrients. Make sure you test your soil before adding any fertilizers and adjust the PH level first. You can find an example of a PH soil test kit here.
Remember, if you’re ever unsure about whether or not you should add fertilizer, you can run a soil test before hand. Pick up some Bone Meal from Nursery Land here or browse our hundreds of products at wildwood.express
Have a suggestion or question?
Sign up
here for more blogs dedicated to better gardening!